-
A Review of Swift 3 OLED: The Prettiest Small Laptop by Acer
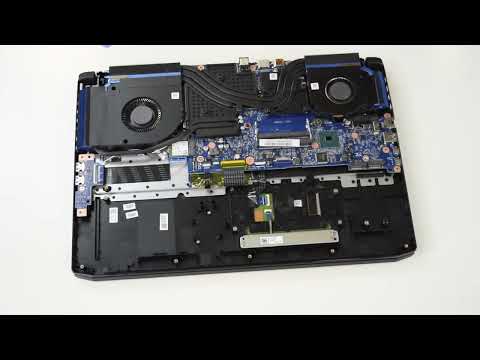
The Acer Swift 3 OLED brings a powerful performance in a colorful and lightweight shell. Its sleek design and modern feel let users enjoy this impressive laptop in style. The Acer Swift 3 OLED features 12th Gen Intel® Core™ processors that enable multitasking and optimized productivity. Users can zip between Windows applications and software without annoying lags, while the laptop can handle more intensive usage like content creation. Its outstanding OLED display delivers stunning dynamic visuals, letting users edit photos and watch movies in vivid color. Here are some of the Acer Swift 3 OLED’s key specifications.
* Processor: Intel® Core™ i7-12700H processor Tetradeca-core 2.30 GHz or Intel® Core™ i5-12500H processor Dodeca-core 2.50 GHz
* Graphics Card: Intel® Iris® Xe Graphics shared memory
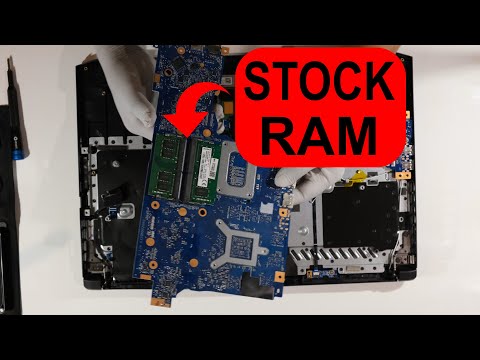
* Memory: 8 GB or 16 GB
* Storage: 1 TB or 512 GB
* Ports: 2x USB 3.2 Gen 1 Type-A, 4x USB, 1x HDMI
* Wireless: IEEE 802.11 a/b/g/n/ac/ax, Bluetooth 5.1 or above
* Power Supply: 100 W max
* Dimensions: 0.70 × 12.3 × 8.4 inches (1.77 x 31.2 x 21.3 cm)
* Weight: 3.09 lb (1.4 kg)
* Operating System: Windows 11 Home (64-bit)
What is an OLED display?
Organic Light-Emitting Diode, or OLED, describes LEDs produced by organic molecules. The technology works by using OLED materials to produce thin films that slide between two conductors, and then applying an electrical current to emit a bright light. OLEDs facilitate emissive displays, meaning each pixel is individually controlled and emits light that can be switched on and off as required. As such, OLEDs are found in smartphones, TVs, and laptops, supporting brilliant image quality, fast motion, and bright colors.
OLED vs traditional LED display
OLEDs and LEDs turn electrical energy into light and are used to power many common display technologies. Although OLEDs offer more advantages over traditional LEDs, the two technologies coexist and are useful in their own ways. One major difference between OLEDs and LED technologies is the materials used — traditional LEDs use inorganic light-producing materials, and OLEDs use organic molecules.
Light production
One difference between OLEDs and traditional LED displays is how each technology produces light. LED devices do not create display images and rely on a backlighting unit to provide light instead. Without backlighting, LED panels would look almost entirely black. In contrast, OLEDs create images and emit light via tiny pixels that act like individual light bulbs. Turning them off leaves a pure-black background, and individually controlling each pixel creates stunning true-to-life image quality.
Energy consumption
A huge benefit of OLED displays is that they consume far less energy than their traditional LED counterparts. Individually controlled pixels mean that OLED displays only use the ones needed to produce an image. Unused pixels remain inactive until it is their time to shine, so devices use only a fraction of the energy required to power LEDs.
Image quality
OLED pixels produce their light and offer superior contrast ratio and color accuracy. Individual pixels can be switched on and off to create more vivid colors and image quality and achieve true black colors when necessary. Although LEDs can achieve higher brightness levels, they use a backlight to illuminate displays, which reduces color accuracy.
Why should I choose the Acer Swift 3 OLED?
The Acer Swift 3 OLED offers an outstanding 16:10, 2.8K OLED display, giving the very best image quality for watching movies or editing photos. With lightning-fast response times and refresh rates, Swift OLED laptops give users blue-free movement and sharper images. Self-emitting pixels produce deeper blacks and brighter whites to show minuscule image details and achieve a superior contract ratio of 1,000,000:1. As always, user safety is at the forefront of Acer technology. The Acer Swift 3 OLED display has been professionally calibrated and holds TÜV RHEINLAND Eyesafe® Display Certification as it balances blue light limitations while preserving image quality, preventing unnecessary eyestrain for maximum comfort.
Stable connectivity
The Acer Swift 3 OLD offers next-generation connectivity options with Wi-Fi 6E. It provides faster speeds for file sharing and 4K streaming so users can work or relax without interruptions.
Portability
At just 3.09 lb (1.4 kg), the Acer Swift 3 OLED device is lightweight and suitable for working on-the-go. The Acer Swift 3 OLED oozes portability so users can simply pick up their OLED laptop and go while offering a maximum battery life of 10 hours for ultimate convenience.
Productivity
The Acer Swift 3 OLED is optimized for multitasking and designed for maximum productivity. It offers consistent responsiveness and wakes up from sleep mode instantly, so users can continue working throughout the day and night. The device offers a CPU performance of 45W, offering ultimate multitasking potential.
Cooling
High-performance devices tend to produce a lot of heat, which must be handled correctly to prevent damage. Acer Swift 3 OLED devices offer heavy-duty thermal solutions like dual heat pipes and an air inlet keyboard to keep everything cool without sacrificing performance. The device also includes two rows of large vents along the bottom panel to protect it from overheating.
Conclusion
OLED displays use organic molecules to produce light at the pixel level, which helps explain why they look so vivid on devices like TVs and laptops. Because each pixel can switch on and off independently, OLED panels can deliver richer colors, deeper blacks, and stronger contrast than traditional backlit displays. The Acer Swift 3 OLED brings those visual benefits into a lightweight, high-performance laptop built for life on the move, with fast response times and stable connectivity that support efficient multitasking throughout the day. If you are interested in picking one up, you can try to buy it from the Acer Store when it comes back in stock.
If you want a more modern step up within the Swift lineup, the Acer Swift 16 AI is also worth a look. It pairs a 16-inch 2880 x 1800 OLED touchscreen with Intel Core Ultra processing, Intel Arc B390 graphics, 16 GB of LPDDR5X memory, and a 1 TB PCIe NVMe SSD, giving users a larger screen and stronger performance without losing the portability expected from a thin and light laptop. With Wi-Fi 7, a premium aluminum chassis, and a design that remains easy to carry at about 3.42 lbs, it is a strong option for students, remote workers, and anyone who wants an OLED laptop that can handle productivity, creative work, and modern AI-assisted tasks in one package.
For more information about the Acer Swift 16 AI, please check out our detailed review!
Recommended Products
Acer Swift 3 OLED
Buy Now
Acer Swift 16 AI
Buy Now
Acer Swift Edge 14 AI
Buy Now
-
Turning Everyday Tasks into AI Workflows with Acer Copilot+ PCs
Introduction
As artificial intelligence becomes more integrated into everyday workflows, businesses are shifting their focus from experimentation to practical application. For most business owners, it’s no longer about what AI can do, but how it can be optimally utilized to improve productivity, streamline operations, and support better decision-making.
Acer TravelMate Copilot+ PCs and AI PCs represent this shift. Built with dedicated NPUs for on-device AI processing, they enable faster, more responsive experiences while keeping the most important data local. More importantly, they introduce new features directly into the Windows experience - helping users interact with content, systems, and information more efficiently throughout the workday.
With new capabilities such as Improved Windows Search, Click to Do, Recall, Live Captions, and Windows Studio Effects, Copilot+ PCs are beginning to reshape how everyday tasks are completed across industries. Rather than acting as standalone tools, these features work within existing workflows to reduce friction, accelerate output, and support more flexible ways of working.
Let’s explore a few of these new AI features and showcase how they might help businesses at large.
Finding What Matters Faster with Improved Windows Search
Accessing the right information at the right time remains one of the most common challenges in modern workplaces. As files, datasets, and documents grow in volume, traditional search methods often fall short - relying heavily on exact file names or manual organization.
Improved Windows Search changes this by introducing semantic search capabilities, allowing users to find files, images, and documents based on context and intent rather than exact matches. By leveraging on-device AI, users can search using natural language, significantly reducing the time spent navigating through OneDrive and local files to find the information you’re looking for.
In practice, this has a measurable impact on productivity. Teams working with large volumes of creative assets or operational documents can retrieve what they need more intuitively, even when file structures are complex or inconsistent.
For example, in creative production workflows where teams manage a high volume of customized content, the ability to quickly locate relevant files without relying on strict naming conventions can remove a major source of friction. Instead of spending time searching, teams can focus on refining and delivering their work to improve both efficiency and overall output quality.
Turning Intent into Action with Click to Do
Beyond finding information, acting on it quickly is just as important. Many workflows today are slowed down by constant context switching: copying content between applications, reformatting text, or manually triggering follow-up tasks.
Activated by pressing the Windows key and clicking with their mouse, Click to Do simplifies this process by enabling users to take immediate action on selected content. Whether it’s summarizing text, rewriting copy, extracting key points, or generating visuals, tasks can be performed directly within the workflow without needing to jump between tools.
This has clear benefits for teams handling content-heavy processes such as PowerPoint presentations, marketing materials, or operational documents. By reducing the steps required to move from draft to final output, Click to Do helps streamline execution while maintaining consistency.
Revisiting Workflows with Recall
As workflows become more complex, one of the less visible challenges is simply keeping track of past activity. From documents and presentations to research and communications, valuable information is often spread across multiple apps and sessions. Recall introduces a new way to approach this by allowing users to revisit previous activity through a searchable timeline. Instead of relying on file names or manual organization, users can revisit previously saved snapshots on the timeline by describing what they saw or were working on.
This can be particularly useful in environments where multiple projects are handled in parallel. For example, teams working across different documents, datasets, or creative assets can quickly return to previously viewed content without retracing steps manually. Whether it’s picking up where work left off or referencing earlier materials, this reduces the time spent searching and helps maintain continuity across tasks.
As with other on-device AI capabilities, this experience is designed to operate locally, giving users more control over how their data is stored and accessed. For organizations evaluating new AI workflows, features like Recall highlight how AI can support not just creation, but also the ability to navigate and manage information more effectively over time.
Breaking Barriers with Live Captions
As businesses become more global and collaborative, communication across languages and accessibility needs is increasingly important. Meetings, training sessions, and virtual collaboration often involve participants with different language backgrounds or varying levels of accessibility.
Live Captions addresses this by providing real-time transcription and translation directly on the device. Because this processing happens locally, it offers both responsiveness and an added layer of privacy - particularly valuable when handling sensitive discussions.
In practical terms, this enables more inclusive and effective communication. Teams can follow conversations more easily, regardless of language differences, while individuals with hearing impairments can engage more fully in meetings and presentations.
For organizations operating across regions or working with diverse teams, this can help reduce misunderstandings and improve collaboration. Training sessions become more accessible, onboarding processes more inclusive, and cross-border communication more seamless - all without requiring additional tools or services.
Enhancing Communication with Windows Studio Effects
Clear communication isn’t only about what is said - it’s also about how it’s delivered. As hybrid work and remote collaboration continue to grow, maintaining a professional and consistent presence in virtual environments has become essential.
Windows Studio Effects enhances video communication by automatically improving how users appear and sound during calls. Features such as background blur, eye contact correction, auto framing, and voice clarity help create a more focused and professional meeting experience without requiring manual adjustments.
For professionals regularly engaging in virtual meetings - whether presenting to clients, collaborating with colleagues, or delivering remote training - this helps reduce distractions and improve overall engagement. It also removes the need for additional setup or third-party tools, allowing users to focus on the conversation itself rather than managing their environment.
Conclusion: From AI Features to Real-World Impact
As AI continues to evolve, its value is increasingly defined by how seamlessly it integrates into everyday work. Features like Improved Windows Search, Click to Do, Recall, Live Captions, and Windows Studio Effects demonstrate how AI can move beyond isolated tools and become a natural part of daily workflows.
Across industries, this shift is already enabling tangible outcomes - from reducing administrative overhead and accelerating content creation to improving communication and supporting more inclusive collaboration. These are not abstract benefits, but practical improvements that help teams work more efficiently and adapt to changing demands.
Acer’s TravelMate Copilot+ PCs, such as the TravelMate P6 14 AI, TravelMate P4 Spin 14 AI, TravelMate P2 14 AI, or TravelMate P2 16 AI laptops, all of which are designed to support this new way of working, combining AI-ready hardware with integrated Windows experiences that bring these capabilities to life. By enabling fast, secure, and locally processed AI workflows, they provide businesses with a foundation to scale productivity, enhance collaboration, and unlock new opportunities for innovation.
Related Products
TravelMate P6 14 AI
Learn More
Acer TravelMate P4 Spin 14 AI
Learn More
Acer TravelMate P2 14 AI
Learn More
Acer TravelMate P2 16 AI
Learn More
-
Swift Edge 14 AI Review: Light, Fast, and Built for AI
Meet the Acer Swift Edge 14 AI, an ultra-light Copilot+ PC built to deliver serious performance, powerful AI features, and all-day battery in a lightweight, stylish design. Light as a feather and swift as an arrow, the Acer Swift Edge 14 AI redefines what a premium thin-and-light laptop can deliver, combining serious performance with a design that feels almost weightless.
At just 2.18 lb, (that’s less than 1kg), it weighs about the same as a small rabbit, making it easy to carry anywhere. This laptop is engineered for users who need power on the move, whether that means working across multiple locations, creating content, or simply staying productive throughout the day without being tied to a desk.
As a Copilot+ PC, this is part of a new generation of intelligent Windows devices. With built-in AI acceleration and up to 48 TOPS of NPU performance, it is designed to support how people actually work today. From handling background tasks to enhancing everyday applications, the system quietly adapts to your workflow, helping you stay focused on what matters. Combined with up to 21 hours of battery life, it delivers a level of freedom that traditional laptops struggle to match.
Designed to move, built to last
https://youtu.be/aZSq94Ldluo
The Acer Swift Edge 14 AI stands out immediately for its stylish design. Built using a premium magnesium-aluminum chassis, it achieves an ultra-light form factor without sacrificing durability. The tapered profile, geometric “S” pattern, and clean finish give it a modern, understated look, while practical touches like the soft-touch keyboard and 180-degree hinge make it comfortable to use in a wide range of situations.
Despite its slim build, it meets MIL-STD 810H durability standards, ensuring it can handle daily use. The lightweight construction means it slips easily into a bag, making it ideal for commuting, travel, or moving between classes and work spaces.
A display that delivers
The 14-inch WQXGA+ OLED display (2880 x 1800) is one of the defining features of the Acer Swift Edge 14 AI. With a 120 Hz refresh rate and a 16:10 aspect ratio, it offers both smooth motion and extra vertical space for productivity. The 3K OLED edge-to-edge touchscreen delivers sharp detail, rich contrast, and intuitive touch interaction across the entire display. Whether you are editing images, watching content, or working on documents, the clarity and color accuracy stand out immediately.
The inclusion of Eyesafe technology and anti-glare features ensures that the display remains comfortable during extended use. It is equally suited to creative work and everyday tasks, delivering a premium visual experience in a compact form
AI that works for you
AI is at the core of the Acer Swift Edge 14 AI experience. With hardware-level AI acceleration and support for hundreds of AI-enabled applications, this thin and light notebook is designed to enhance productivity without adding complexity. Features such as real-time subtitles, intelligent search, and AI-assisted content creation help streamline everyday workflows.
Because much of this processing happens on-device, it also improves responsiveness and privacy. The system can handle AI-driven tasks locally, reducing reliance on cloud processing and making interactions faster, more secure, and seamless.
Performance without the weight
Despite its ultra-light build, the Acer Swift Edge 14 AI delivers strong performance across a wide range of tasks. Powered by Intel Core Ultra 7 and Core Ultra 9 processors and supported by Intel Arc graphics, it is capable of handling productivity workloads, creative projects, and multitasking with ease.
Built on Intel’s latest architecture, these Core Ultra chips combine performance cores, efficiency cores, and a dedicated AI engine (NPU), allowing the laptop to balance power and battery life more effectively than previous generations. This hybrid design means demanding tasks like content editing and heavy multitasking are handled by the performance cores, while background processes run efficiently without draining resources.
The integrated Intel Arc graphics further enhance everyday performance, offering enough graphical power for light creative work, media editing, and even casual gaming, while also accelerating AI-driven features in supported applications.
With up to 32 GB of LPDDR5X memory and fast PCIe NVMe storage, the system remains responsive even under heavier workloads. Whether you are switching between applications, working with large files, or running multiple processes at once, it maintains a smooth and consistent experience.
Connectivity and everyday use
The Acer Swift Edge 14 AI also delivers on connectivity, with Wi-Fi 7 providing faster and more stable network performance. Bluetooth 5.4 ensures reliable connections to wireless accessories, while USB-C ports with Thunderbolt 4 support allow for flexible expansion and fast data transfer.
Additional features such as a 1080p webcam and DTS:X Ultra audio make it well suited for video calls, online collaboration, and media consumption. Despite its slim design, it remains a fully capable everyday device. Now, let’s check out the two Acer Swift Edge 14 models.
1. Acer Swift Edge 14 AI – SFE14-51T-75PZ
The Acer Swift Edge 14 AI – SFE14-51T-75PZ, priced at $1,499.99 delivers strong performance for everyday productivity, creative work, and AI-assisted tasks. It is designed for users who want a premium ultra-light laptop that remains efficient, responsive, and reliable across a full day of use.
Powered by the Intel Core Ultra 7 258V processor, this model focuses on delivering smooth multitasking and consistent performance for typical workloads. It handles document work, browsing, media editing, and general productivity with ease, while maintaining strong power efficiency to support long battery life.
With 32 GB of LPDDR5X memory and a 1 TB SSD, it provides plenty of headroom for multitasking and storage. Combined with the featherlight design and up to 21 hours of battery life, it is ideal for users who prioritize portability without giving up performance. Remember, if you buy through the Acer Store, students can get a 15% discount with Student Beans, with the 15% discount, you’ll only pay $1274.99
Core tech includes:
* Intel Core Ultra 7 258V processor (2.20 GHz, 8 cores, 48 TOPS NPU)
* Intel Arc Graphics 140V
* 14-inch 2880 x 1800 OLED touchscreen, 120 Hz, Eyesafe
* 32 GB LPDDR5X memory
* 1 TB PCIe NVMe SSD
* Wi-Fi 7, Bluetooth 5.4
* Up to 21 hours battery life
2. Acer Swift Edge 14 AI – SFE14-51T-97KS
The Acer Swift Edge 14 AI – SFE14-51T-97KS steps things up with a more powerful processor while keeping the same ultra-light design. It is built for users who need extra performance for demanding tasks, heavier multitasking, and more advanced workflows. Powered by the Intel Core Ultra 9 288V processor, this version delivers higher clock speeds and stronger sustained performance. This makes a noticeable difference in scenarios such as working with large files, running multiple demanding applications, or handling more intensive creative projects. The Acer Swift Edge 14 AI – SFE14-51T-97KS is now priced at $1,499.99 (reduced from $1,599.99). The discount is a limited time special Micro Center Deal, so act fast if you want to snap up one of these beauties before they’re all gone!
While both models share the same memory, storage, display, and battery life, the Ultra 9 configuration provides additional processing headroom. This ensures that the system remains fast and responsive even under heavier workloads, making this thin and light laptop a better fit for users who regularly push their device further. Principal features include:
* Intel Core Ultra 9 288V processor (3.30 GHz, 8 cores, 48 TOPS NPU)
* Intel Arc Graphics 140V
* 14-inch 2880 x 1800 OLED touchscreen, 120 Hz, Eyesafe
* 32 GB LPDDR5X memory
* 1 TB PCIe NVMe SSD
* Wi-Fi 7, Bluetooth 5.4
* Up to 21 hours battery life
Choosing between the two
The difference between these two Acer Swift Edge 14 AI models comes down to processing power. The Ultra 7 version is ideal for users who want efficient, high-performance computing for everyday tasks, while the Ultra 9 version is better suited to those who need extra performance for demanding workloads and advanced multitasking.
Both models deliver the same ultra-light design, premium OLED display, and long battery life, ensuring that whichever you choose, you are getting a powerful and highly portable device built for modern computing.
Reflections on Acer Swift Edge 14 AI
The Acer Swift Edge 14 AI proves that thin and light laptops no longer have to compromise on performance. Weighing just 2.18 lb, it combines ultra-portability with powerful Intel Core Ultra processors and up to 21 hours of battery life. Whether you choose the Ultra 7 or Ultra 9 configuration, both models deliver the same premium OLED display, generous memory, and AI-powered features that make everyday work faster and more intuitive.
For users looking at thin and light notebooks that can handle productivity, creative tasks, and modern AI workloads, the Acer Swift Edge 14 AI stands out as a strong option. If you want to move freely, work efficiently, and still have the performance to handle whatever the day brings, choose the Acer Swift Edge 14 AI.
FAQs
Is the Acer Swift Edge 14 AI good for everyday use?
Yes. It is designed for productivity, multitasking, and creative work, with enough power to handle modern applications while remaining highly portable at just 2.18 lb.
What makes the Acer Swift Edge 14 AI different from other thin and light laptops?
Its combination of a 2.18 lb design, OLED display, long battery life, and built-in AI acceleration sets it apart from many standard thin and light laptops.
What’s the difference between the Ultra 7 and Ultra 9 models?
The main difference is processing power. The Ultra 9 model offers higher performance for demanding workloads, while the Ultra 7 model focuses on efficiency and balanced everyday use.
How long does the battery last?
Both models offer up to 21 hours of battery life, depending on usage, making them suitable for full-day or multi-day use without frequent charging.
Recommended Products
Acer Swift Edge 14 AI
Buy Now
Acer Aspire 16 AI
Buy Now
Acer Swift Go 16 AI
Buy Now
-
Is a Chromebook a Computer?
For many buyers, the real question is not whether a Chromebook counts as a “real” computer, but whether it can do the work they need every day. In 2026, that line is far less dramatic than it used to be. Both Chromebooks and Windows laptops can handle writing, video calls, research, streaming, web apps, and day-to-day productivity. The difference is not legitimacy. It is approach.
That matters because the definition of a computer has changed. For a lot of people, the browser has become the main workspace. Documents live in the cloud, meetings happen in Zoom, files sync automatically, and many of the tools people rely on now run through a web app rather than a heavy local install. In that environment, a Chromebook is not an imitation of a computer. It is a computer built around a different philosophy.
A better way to think about it is this: a computer is a machine that helps you solve problems. Both Chromebooks and Windows PCs do that. They just prioritize different strengths.
The shared essentials
The gap between Chromebooks and Windows laptops is smaller than a lot of people assume. Both can handle the basics that define modern computing. Microsoft 365 works on Chromebooks through the web, Google Workspace is naturally at home there, and Zoom supports Chromebook users through its web app and ChromeOS experience. If your day revolves around email, browser tabs, presentations, meetings, and collaborative documents, both platforms are fully capable.
The same is true on the hardware side. Acer’s current Chromebook and Windows laptop ranges both show that buyers no longer have to accept weak design or low-quality screens just because they choose a lighter workflow. Acer Chromebook models now include higher-resolution displays, modern processors, AI features, and even Wi-Fi 7 on select models, while the Swift line continues to push thin-and-light portability with OLED display options and current Intel, AMD, and NVIDIA hardware.
Connectivity is no longer a dividing line either. Whether you buy a Chromebook or a Windows laptop, you can now expect modern wireless standards, Bluetooth support, and compatibility with today’s accessories and peripherals. The choice is less about whether the machine can connect to your life and more about how much local horsepower you need once it does.
ChromeOS vs. Windows
Where the two paths split is in how the operating system is built.
ChromeOS is the streamlined option. It is designed around speed, simplicity, and low friction. Chromebooks are known for quick startup, automatic updates, and a security model that includes sandboxing, verified boot, and built-in protection layers, which reduces the amount of hands-on maintenance many users associate with traditional PCs. For people who mostly live in a browser, that makes a Chromebook feel refreshingly direct.
Windows takes the opposite view. It is built for breadth and local power. A Windows laptop gives you the freedom to install full desktop software, run specialized programs, manage files in more flexible ways, connect niche hardware, and work with advanced drivers and utilities. If your workflow depends on full-featured creative suites, professional software, or programs that still arrive as traditional installs, Windows remains the more expansive platform.
That is why the Chromebook versus Windows debate usually becomes clearer once you stop talking about categories and start talking about habits.
Which one fits your life?
The always-mobile user
If your work happens in coffee shops, airports, classrooms, and hotel lobbies, a Chromebook makes a strong case. It is built for people who want to open the lid, get online, and start working without much fuss. Long battery life, automatic syncing, and a lightweight daily experience make it particularly appealing for writers, remote workers, and frequent travelers. Acer’s Chromebook range reflects exactly that kind of pick-up-and-go design.
The creative and professional power user
If you edit video, manage complex spreadsheets, juggle demanding applications, or rely on local software for work, Windows is usually the stronger answer. This is where raw processing power, broader software compatibility, and more flexible hardware support matter. Acer’s Swift family covers portable premium systems, while more performance-focused Windows machines can step up for heavier creative or technical workloads.
The student
For many students, a Chromebook is still one of the easiest recommendations. It covers research, essays, web-based assignments, video classes, and collaboration with very little setup. It is also easier on the budget, and the ChromeOS ecosystem fits naturally with Google tools commonly used in education. On top of that, Chromebook update support now stretches to 10 years on new devices, which helps the value argument.
The pros and cons at a glance
Chromebook pros
Chromebooks are usually more affordable, easier to maintain, quick to start, and deeply tied to cloud syncing. Their security model is also one of their biggest selling points, since ChromeOS includes built-in protections and automatic updates rather than expecting users to manage as much themselves.
Chromebook cons
The tradeoff is that Chromebooks are not ideal for every heavy offline workflow. If you need full desktop versions of advanced editing software, specialized enterprise tools, or particular Windows-only applications, ChromeOS can feel limiting. Microsoft itself steers Chromebook users toward the web versions of Microsoft 365, which tells you a lot about where the platform’s center of gravity still is.
Windows pros
Windows laptops remain the most flexible option for buyers who want maximum compatibility. They can handle traditional desktop apps, local game installs, larger storage configurations, more specialized workflows, and a wider range of accessories and hardware-dependent use cases. If you want a machine that can do almost everything, Windows still has the broadest reach.
Windows cons
That flexibility comes with more upkeep. Windows machines generally ask more of the user over time, whether that means managing updates, driver behavior, software installs, storage, or system performance. And once you move into premium performance territory, prices rise quickly.
The Acer ecosystem: quality across the board
One reason this debate feels less rigid now is that Acer has products on both sides that are clearly built with intent. The company does not treat Chromebooks as disposable side devices and Windows laptops as the only serious machines. Its current Chromebook lineup shows that ChromeOS hardware can now include stronger specs, sharper displays, AI tools, and modern connectivity.
On the Windows side, Acer gives buyers distinct lanes. The Swift series is the natural fit for users who want premium portability, thin-and-light design, and modern AI PC features. The Aspire line remains the practical home-use choice for people who want versatility without jumping straight into gaming or workstation pricing.
Then there is the gaming exception. If high-end local PC gaming is part of the plan, Windows is still the stronger choice. Acer’s Nitro and Predator lines remain in that category because modern PC gaming depends on broad software support, dedicated graphics performance, and the kind of local horsepower ChromeOS is not primarily designed around. That said, Chromebooks are not shut out of gaming entirely, since cloud gaming can make them a viable option for players with a strong internet connection.
Final verdict
So, is a Chromebook a real computer?
Yes, of course it is. The better question is whether it is the right computer for you.
If your life runs through a browser, cloud storage, web apps, and constant mobility, a Chromebook may actually be the smarter and more modern fit. If your work depends on heavyweight local software, advanced multitasking, gaming, or specialized hardware, a Windows laptop is still the better tool.
This is not a fight between real and fake. It is a choice between streamlined computing and expansive computing. Both are valid. The right answer depends on the work you do, where you do it, and how much flexibility you need from your machine. For buyers comparing current options, Acer’s Chromebook, Swift, Aspire, Nitro, and Predator ranges make that choice easier by covering nearly every kind of user in one ecosystem.
FAQ
Is a Chromebook considered a real computer?
Yes, a Chromebook is a real computer. It can handle everyday tasks like web browsing, schoolwork, video calls, streaming, and online productivity.
Is a Chromebook better than a Windows laptop?
A Chromebook is better for some people, while a Windows laptop is better for others. Chromebooks are often best for simple, cloud-based tasks, while Windows laptops are better for advanced software, gaming, and heavier workloads.
What is the main difference between a Chromebook and a laptop?
A Chromebook is a type of laptop that runs ChromeOS instead of Windows. The biggest difference is that Chromebooks are designed around web apps and cloud tools, while Windows laptops support a wider range of local software and hardware.
Are Chromebooks good for students?
Yes, Chromebooks are a good choice for many students. They are usually affordable, easy to use, and well suited for research, writing, online classes, and Google-based school tools.
Can a Chromebook run Microsoft Office?
Yes, a Chromebook can run Microsoft Office through Microsoft 365 on the web. This is enough for many users who need Word, Excel, and PowerPoint for everyday work or school tasks.
Can you play games on a Chromebook?
Yes, you can play games on a Chromebook, especially through cloud gaming and lighter apps. For high-end local PC gaming, a Windows laptop is still the better option.
Is a Chromebook good for work from home?
A Chromebook can be a good work-from-home laptop if your job mainly involves email, documents, web apps, and video meetings. If you need specialized desktop software or heavy multitasking, a Windows laptop may be a better fit.
Do Chromebooks need antivirus software?
Most Chromebooks do not need traditional third-party antivirus software. ChromeOS includes built-in security features that make the platform simple and low-maintenance for many users.
What are Chromebooks best for?
Chromebooks are best for web browsing, writing, streaming, schoolwork, cloud storage, and day-to-day productivity. They are a strong option for users who want speed, simplicity, and long battery life.
Should I buy a Chromebook or a Windows laptop?
You should buy a Chromebook if you want an affordable, easy-to-use device for everyday online tasks. You should buy a Windows laptop if you need more power, more software options, or better support for gaming and creative work.
Recommended Products
Acer Chromebook Spin 514
Buy Now
Acer Chromebook Tab 311
Buy Now
Acer Chromebook 315
Buy Now
-
Acer Gaming Computers With the Intel Ultra 9 CPU
If you are looking for the most powerful Acer gaming systems available today, this article explores a range of Predator laptops and desktops powered by Intel Core Ultra 9 processors. From premium portable machines to full-scale gaming desktops, these systems are built for users who need serious performance for gaming, content creation, and demanding workloads.
Across the Predator lineup, Intel Core Ultra 9 brings a new level of efficiency and capability, making it a strong choice for anyone researching Intel Core Ultra 9 laptops or high-end gaming PCs. Whether you are comparing options or wondering if Intel Core Ultra 9 is faster than i9, these systems highlight what the latest generation of Intel hardware can deliver.
What is the Intel Core Ultra 9 CPU?
The Intel Core Ultra 9 285K is a flagship desktop processor built on Intel’s Arrow Lake architecture, featuring a 24-core setup with 8 performance cores and 16 efficiency cores. It reaches boost speeds of up to 5.7 GHz and introduces a tile-based design that moves away from traditional layouts. Instead of relying on hyperthreading, it focuses on more efficient core distribution, allowing it to handle both gaming and heavy productivity tasks with strong single-core and multi-core performance.
Efficiency is a key part of this generation. Compared to previous high-end Intel CPUs, the Ultra 9 runs cooler and uses less power under load, while still delivering high performance across gaming, editing, and professional workloads. It also includes built-in AI capabilities and updated integrated graphics, supporting modern workflows such as video encoding and AI-assisted applications, while pairing with DDR5 memory and next-generation platforms for improved overall system performance.
1. Predator Triton 14 AI – PT14-52T-972D
The Acer Predator Triton 14 AI – PT14-52T-972D is a high-end Intel Core Ultra 9 laptop designed for users who want serious performance in a compact form. Powered by the Intel Core Ultra 9 288V processor, it delivers strong single-core speed for gaming alongside efficient multi-core performance for heavier workloads. Now available for $2,249.99, reduced from $2,499.99, it sits firmly in premium territory as a high performance laptop built for demanding use.
Peak performance is where this system really stands out. The combination of Intel Ultra 9 processing and NVIDIA RTX 5070 graphics gives it the headroom to handle modern AAA titles, creative software, and multitasking without slowdown. It is well suited for users working across gaming, video editing, and content production, making it a natural fit for both play and professional workloads. It also benefits from the efficiency improvements of the latest Intel platform, helping maintain performance while managing thermals in a compact chassis.
This model fits naturally into the premium gaming laptop category, while also working as a capable laptop for content creator workflows. Despite its power, the 14.5-inch form factor keeps it portable enough for users who want performance without moving to a full desktop setup. Core configuration:
* Processor: Intel Core Ultra 9 288V, 8-core, up to 5.10 GHz
* Graphics: NVIDIA GeForce RTX 5070, 8 GB GDDR7
* Memory: 32 GB LPDDR5X
* Storage: 1 TB PCIe NVMe 4.0 SSD
* Display: 14.5-inch WQXGA+ (2880 x 1800), OLED, 120 Hz, touchscreen
* Wireless: Killer Wi-Fi 7 (802.11be), Bluetooth 5.4
* Ports: 4× USB, HDMI, audio in/out
* Battery: 76 Wh (up to 7 hours)
* Weight: 3.53 lbs
2. Predator Helios Neo 16 AI Gaming Laptop – PHN16-73-979X
The Acer Predator Helios Neo 16 AI – PHN16-73-979X is built around the Intel Core Ultra 9 platform, pushing this system firmly into high-end territory for users who need serious performance. Powered by the Intel Core Ultra 9 275HX processor, it combines a 24-core design with high boost speeds, making it a strong option for both gaming and heavy productivity. At $2,649.99, this is aimed at users looking for a high performance laptop that can handle demanding workloads without compromise.
What stands out about this premium gaming laptop is the scale of the configuration. With 64 GB of DDR5 memory and a 2 TB SSD, this system is built to manage large files, complex projects, and sustained multitasking with ease. The RTX 5070 Ti graphics further extend its capability, allowing it to run modern AAA games at high settings while also supporting creative workflows such as video editing, 3D work, and rendering. It is a clear example of how intel core ultra 9 laptops are evolving into hybrid gaming and workstation systems.
In practical use, this model delivers the kind of performance headroom that lets you run multiple demanding tasks at once without slowdown. Whether that is gaming while streaming, editing large media files, or working across multiple applications, it remains responsive under load. It fits squarely within Acer’s high performance gaming laptops category, offering a powerful mobile alternative to a traditional intel core ultra 9 gaming pc setup. Full configuration:
* Processor: Intel Core Ultra 9 275HX, 24-core, up to 5.40 GHz
* Graphics: NVIDIA GeForce RTX 5070 Ti, 12 GB GDDR7
* Memory: 64 GB DDR5
* Storage: 2 TB PCIe NVMe 4.0 SSD
* Display: 16-inch WQXGA (2560 x 1600), OLED, 240 Hz
* Wireless: Killer Wi-Fi 6E AX1675i, Bluetooth 5.4
* Ports: 5× USB, HDMI, RJ-45 Ethernet, audio in/out
* Battery: up to 5 hours
* Weight: 5.95 lbs
3. Predator Orion 7000 Gaming Desktop – PO7-665_Z890-UR11
The Acer Predator Orion 7000 – PO7-665_Z890-UR11 is a full-scale intel core ultra 9 gaming pc built for users who want maximum performance without the limits of a laptop form factor. Powered by the Intel Core Ultra 9 285K processor, this system represents the top end of what the current Intel Ultra 9 platform can deliver. At $4,999.99, it is positioned as a flagship desktop for gaming, content creation, and high-end workloads.
Here the architecture really opens up. The 24-core Intel Core Ultra 9 setup provides strong single-core speed for gaming while also delivering the multi-core performance needed for rendering, simulation, and heavy multitasking. Combined with the RTX 5080 graphics card, it is built to handle modern AAA titles at ultra settings, as well as demanding creative applications. With this CPU and GPU combo, you’re stepping into 4K gaming territory with smooth performance and no real hit to FPS or responsiveness. It also benefits from improved efficiency compared to previous generations, showing why many consider this the best intel ultra cpu for gaming and productivity-focused builds.
Unlike mobile systems, this desktop gives you full thermal headroom and upgrade flexibility, making it a long-term platform rather than a fixed configuration. With 64 GB of DDR5 memory and expansion potential up to 128 GB, it is well suited to professional workflows and future scaling. It also ties into Intel’s broader ecosystem, including support for modern drivers such as the intel corporation graphics driver, ensuring stability across gaming and creative tasks. System breakdown:
* Processor: Intel Core Ultra 9 285K, 24-core, up to 5.50 GHz
* Graphics: NVIDIA GeForce RTX 5080, 16 GB GDDR7
* Memory: 64 GB DDR5 (expandable to 128 GB)
* Storage: 2 TB PCIe NVMe 4.0 SSD
* Wireless: Wi-Fi 7 (802.11be), Bluetooth 5.4
* Ports: 8× USB, HDMI, DisplayPort
* Power: 850 W PSU
4. Predator Helios 18 AI Gaming Laptop – PH18-73-99A8
The Acer Predator Helios 18 AI – PH18-73-99A8 is the most extreme high performance laptop in this lineup, built around the Intel Core Ultra 9 platform and designed to push performance to its limits. With a massive 18-inch display and top-tier internal hardware, this machine is closer to a portable workstation than a typical laptop. At $6,999.99, it is aimed at users who want maximum capability in a single system, with no compromise.
Everything about this configuration is scaled up. The 24-core Intel Core Ultra 9 275HX processor works alongside an RTX 5090 with 24 GB of dedicated memory, giving it the power to handle ultra high-end 4k gaming, complex rendering, and intensive creative workloads. Add in 192 GB of DDR5 memory and a 6 TB SSD, and this system is built for projects that demand serious resources. It is a clear example of how far intel ultra 9 systems can go when performance is the priority, making it one of the most capable options for users asking is intel core ultra 9 faster than i9 in real-world workloads.
Despite its size, it still fits within Acer’s thin gaming laptops category, offering mobility compared to a full desktop setup while delivering comparable performance in many scenarios. The large, high-resolution display also makes it ideal for users working across detailed timelines, complex visuals, or multi-window workflows. Full configuration below:
* Processor: Intel Core Ultra 9 275HX, 24-core, up to 5.40 GHz
* Graphics: NVIDIA GeForce RTX 5090, 24 GB GDDR7
* Memory: 192 GB DDR5
* Storage: 6 TB PCIe NVMe 5.0 SSD
* Display: 18-inch WQUXGA (3840 x 2400), IPS, 120 Hz, matte (ComfyView), Eyesafe
* Wireless: Killer Wi-Fi 7 (802.11be), Bluetooth 5.4
* Ports: 5× USB, HDMI, RJ-45 Ethernet, audio in/out
* Battery: up to 5.5 hours
* Weight: 7.72 lbs
Apex Predators: Acer Gaming Systems Powered by Intel Core Ultra 9
The Predator lineup shows exactly what the Intel Core Ultra 9 platform is capable of across both laptops and desktops. From compact systems like the Triton 14 AI to full-scale machines like the Helios 18 AI and Orion 7000, these devices are built to handle serious gaming, content creation, and demanding workloads without hesitation.
Whether you are exploring Intel Core Ultra 9 laptops or stepping up to a full Intel Core Ultra 9 gaming pc, the key advantage here is balance. You are getting strong single-core performance for gaming, multi-core power for productivity, and improved efficiency compared to previous generations. That combination is what makes Intel Ultra 9 one of the most compelling options right now for users who need both performance and flexibility. Before we leave, remember that students are entitled to a whopping 15% discount, so strike while the iron is hot!
If you are still wondering if Intel Core Ultra 9 is faster than i9, the answer in most modern workflows is yes. While gaming gains can vary, the improvements in efficiency, multitasking, and creative performance make it a clear step forward, especially in high-end systems like these.
FAQs
What is the Intel Core Ultra 9 processor?
It is Intel’s flagship CPU tier, designed for high-end gaming, multitasking, and professional workloads.
Is Intel Core Ultra 9 faster than i9?
In many cases, yes. It offers better efficiency and stronger performance in multitasking and creative applications.
Are Intel Core Ultra 9 laptops good for gaming?
Yes, especially when paired with dedicated GPUs like RTX 5070, 5080, or 5090.
What is the best Intel Ultra CPU for gaming?
The Intel Core Ultra 9 285K is widely considered one of the best options for high-end gaming and productivity builds.
Do I need an Intel Core Ultra 9 system?
It is best suited for users who need top-tier performance for gaming, content creation, or heavy multitasking.
Recommended Products
Predator Triton 14 AI (RTX 5070 Ti)
Buy Now
Predator Orion 7000 (RTX 5080)
Buy Now
Predator Helios 18 AI (RTX 5090)
Buy Now
-
10 Best Underrated Places for Digital Nomads in South East Asia
Southeast Asia is full of digital nomad destinations, but not all of the best places are the ones that get the most attention. While cities like Bangkok and Bali tend to dominate the conversation, many remote workers are just as likely to find a better long-term fit in places that feel more manageable, more affordable, or simply less saturated. That is part of what makes this region so appealing.
A digital nomad can choose between larger urban bases such as Kuala Lumpur, Da Nang, and Phnom Penh, lifestyle-driven destinations like Siargao and Hội An, or quieter alternatives such as Penang and Kuching that still offer the essentials needed for remote work. Each location brings a different balance of cost, convenience, culture, and pace of life, which means the best choice often depends less on popularity and more on how you actually want to live and work. For people moving between cafés, apartments, coworking spaces, and regional flights, the gear matters too, which is why Acer’s thin and light laptops are a natural fit for the digital nomad lifestyle.
With that in mind, here are 10 underrated places in Southeast Asia that offer a strong mix of affordability, livability, and remote-work potential for digital nomads.
10 Best Underrated Places for Digital Nomads in South East Asia
1. Penang, Malaysia
https://www.youtube.com/watch?v=aONlfuHjSuM&pp=ygUccGVuYW5nIG1hbGF5c2lhIHdhbGtpbmcgdG91cg%3D%3D
Penang is one of the easiest places in Southeast Asia to recommend to digital nomads who want a strong balance of affordability, comfort, and daily convenience without moving to a city that feels overly crowded or overhyped. It offers a mix of historic neighborhoods, modern high-rise living, and some of the best street food in the region, which helps it stand out from more generic remote-work hubs. For digital nomads who care about quality of life as much as work output, Penang can feel like a place where it is possible to settle into a routine rather than just pass through.
Part of Penang’s appeal is that it is relatively easy to live in, especially for English-speaking foreigners. English is widely spoken, food is inexpensive, and modern condos with amenities like pools and gyms are still fairly attainable compared with many Western cities. The work setup is also solid rather than spectacular. Internet in apartments is generally much more reliable than public café Wi-Fi, and there is a growing coworking and café scene in George Town for people who do not want to work from home every day.
That said, Penang is not perfect for everyone. The weather is hot and humid year-round, public transportation is limited, and some parts of George Town can be noisy depending on where you stay. It is also better suited to nomads who want a more relaxed, locally integrated lifestyle than those looking for a huge, highly visible digital nomad scene. Still, for remote workers who value food, culture, affordability, and a slower island-city rhythm, Penang is an easy place to see the long-term appeal.
Key factors:
* Cost of living: Around $1,100 to $1,400 USD per month for a comfortable lifestyle
* Safety: Generally comfortable for everyday living, though normal city awareness still matters
* Ease of transportation: Mixed; public transit is limited, but Grab is cheap and convenient
* Internet: Good in modern condos and coworking spaces; café Wi-Fi can be inconsistent
2. Surabaya, Indonesia
https://www.youtube.com/watch?v=XiMhh_Vge9w
Surabaya is not the kind of place that tries to charm digital nomads at first glance. It is busy, sprawling, hot, and unmistakably urban. Yet that is exactly why some remote workers may find it appealing. Instead of selling a polished lifestyle image, Surabaya offers something more practical: low costs, modern city conveniences, and a daily environment that feels rooted in local life rather than built around foreign visitors.
For nomads who like large cities, Surabaya has real advantages. The cost of living is low for a city of its size, and the mall culture is a genuine asset rather than a cliché. Places like Tunjungan Plaza and Pakuwon Mall can double as comfortable work zones, meal stops, and escape routes from the heat. Add in a growing café scene and a handful of solid coworking spaces, and the city starts to make more sense as a work base than its reputation might suggest. It also helps that Surabaya works well as a launch point for weekend trips to Mount Bromo or Ijen, which gives the city an outdoor payoff that is not obvious at first.
Still, this is not a destination for everyone. You will not get a beach-town atmosphere, a highly visible nomad network, or a city built for walking. Traffic is part of daily life, the heat can be draining, and the social experience may feel isolating if you want an instant international circle. But for digital nomads who care more about value, authenticity, and day-to-day functionality than hype, Surabaya has a lot more going for it than people often assume.
Key factors:
* Cost of living: Around $800 to $1,000 USD per month
* Safety: Generally reasonable for daily life, but standard big-city caution is important
* Ease of transportation: Best handled through Grab or Gojek since the city is not very walkable
* Internet: Usually dependable in malls, coworking spaces, and newer apartments, with mobile data as a useful backup
3. Siargao, Philippines
https://www.youtube.com/watch?v=4OfhAq975sM&pp=ygUhU2lhcmdhbywgUGhpbGlwcGluZXMgd2Fsa2luZyB0b3Vy
If Penang is about convenience and Surabaya is about practicality, Siargao is about lifestyle. This is the kind of place that sells people on the idea of remote work in the first place: palm-lined roads, surf breaks at sunrise, cafés filled with laptops by mid-morning, and a social scene that makes it easy to meet other travelers and remote workers. For digital nomads who want their work life to sit beside beach life rather than compete with it, Siargao has obvious appeal.
What makes the island more viable than it used to be is connectivity. Siargao’s old reputation for unreliable internet kept many serious remote workers away, but that has changed a lot. New fiber connections and Starlink-backed coworking spaces have made General Luna much more workable as a remote base, especially for people who choose their accommodation carefully. The island now has enough laptop-friendly cafés, coworking hubs, and community events to feel like a legitimate nomad destination rather than just a backpacker stop with good marketing.
That does not mean Siargao is effortless. Power outages still happen, infrastructure is still uneven, and the island’s growing popularity has pushed prices up. It is also the sort of place where discipline matters, because when the beach, the surf, and your friends are all five minutes away, work can slip. Even so, for nomads who want a tropical environment, an active international scene, and a destination that feels more personal than corporate, Siargao earns its place on the list.
Key factors:
* Cost of living: Usually around $1,200 to $1,800 USD per month, depending on housing and lifestyle
* Safety: Generally comfortable for everyday island life, though motorbike caution is important
* Ease of transportation: Mostly centered around motorbikes and short local rides
* Internet: Much better than before, with many coworking spaces and cafés now offering 50 to 200 Mbps, though backup power still matters
4. Hội An, Vietnam
https://www.youtube.com/watch?v=cm50M7kCV98&pp=ygUeSOG7mWkgQW4sIFZpZXRuYW0gd2Fsa2luZyB0b3Vy
Not every digital nomad wants a city that runs at full speed. Hội An works because it offers the opposite. The town’s appeal is not just that it looks beautiful, though it clearly does. It is that the setting actually changes how the workday feels. A café near the old town, a rented house by the rice fields, or a short ride to An Bang Beach can all sit within the same daily routine, which gives Hội An a softer, more livable rhythm than larger Vietnamese cities.
That slower mood would not matter much if the basics were weak, but they are not. Vietnam’s official e-visa system allows stays of up to 90 days with single- or multiple-entry options, which helps make the country practical for longer remote-work stays. On the ground, Hội An has a reputation for strong internet, with many nomads reporting fast café and accommodation speeds, and coworking options such as The Hub Hoi An have helped turn the town into more than just a pretty stop between bigger destinations.
The trade-off is that Hội An can be almost too charming for its own good. The old town gets crowded, the rainy season can be disruptive, and anyone who needs the energy, nightlife, or sheer convenience of a major city may find it limiting after a while. Still, for writers, designers, developers, and remote workers who value atmosphere as much as efficiency, Hội An is one of the easiest places in Southeast Asia to imagine staying longer than planned.
Key factors:
* Cost of living: Around $900 to $1,200 USD per month for a comfortable stay, depending on housing style and season
* Safety: Generally good for day-to-day living, with the usual care needed around scooters, crowds, and weather
* Ease of transportation: Easy to get around by bicycle, scooter, or short ride-hailing trips
* Internet: Typically strong, with many cafés, rentals, and coworking spaces offering fast fiber connections
5. Da Nang, Vietnam
https://www.youtube.com/watch?v=3zwJsugVRWM&pp=ygUdRGEgTmFuZywgVmlldG5hbSB3YWxraW5nIHRvdXI%3D
Da Nang is the easy recommendation for remote workers who want fewer compromises. It has enough city infrastructure to feel practical, enough beach access to feel relaxed, and enough scale to avoid the small-town limitations that show up in places like Hội An. Vietnam’s 90-day e-visa system also makes it relatively straightforward for many foreigners to base themselves there for longer stays, with single- and multiple-entry options available through the official immigration portal.
What makes Da Nang stand out is not that it is the most extreme option in any one category, but that it performs well across almost all of them. You get a coastal setting, modern roads, a large airport, coworking options, and a growing remote-work scene without paying the premium that often comes with more saturated nomad hubs. It also helps that Da Nang still feels like a functioning Vietnamese city rather than a destination built entirely around foreigners, even if some nomads do end up staying mostly in the An Thuong area near the beach. Listings and meetup activity also suggest there is a visible remote-work community on the ground, including spaces such as DNC and recurring nomad events in the city.
The catch is that Da Nang can feel almost too balanced for people who want something more distinctive. It is not as visually romantic as Hội An, not as intense as Ho Chi Minh City, and not as obviously social as Siargao. The rainy stretch from late autumn into winter can also dull the beach-city appeal. Still, if someone asks for one place in Southeast Asia that can handle work, lifestyle, convenience, and longer-term livability all at once, Da Nang is one of the strongest answers.
Key factors:
* Cost of living: Around $1,100 to $1,200 USD per month based on current nomad cost estimates
* Safety: Generally considered comfortable for day-to-day living by nomad reviewers, though normal city awareness still applies
* Ease of transportation: Easier to move around than many larger Vietnamese cities, with a large airport and broad urban layout, though most people still rely on scooters or ride-hailing for daily convenience
* Internet: Good enough for remote work in most setups
6. Cebu City, Philippines
https://www.youtube.com/watch?v=eFf4XbQe-3A&pp=ygUjQ2VidSBDaXR5LCBQaGlsaXBwaW5lcyB3YWxraW5nIHRvdXLSBwkJ2QoBhyohjO8%3D
Cebu City makes the strongest case for remote workers who treat location less as a backdrop and more as an operating base. This is not the Philippines at its most idyllic. It is the Philippines at its most useful: a major regional business center with established commercial districts, widespread English use, and an international airport that makes short escapes or onward travel relatively easy. Mactan-Cebu International Airport remains one of the country’s main gateways, which matters more than it sounds when weekend flexibility is part of the appeal.
That practicality shapes the work environment too. Cebu IT Park and Cebu Business Park give the city a more structured feel than beach-first destinations like Siargao, and that helps if your routine depends on stable housing, office-style amenities, and a schedule built around clients in other time zones. The Philippines’ Bureau of Immigration also currently provides online tourist visa extension services, which is useful for foreigners staying beyond an initial entry period, even if visa rules should always be checked directly before travel.
Cebu’s downside is familiar to anyone who has lived in a fast-growing city: traffic, sprawl, and the sense that convenience depends heavily on choosing the right neighborhood. It is easier to enjoy Cebu if you cluster your life tightly, living near where you work and spending less time fighting the roads. For digital nomads who want a more polished urban setup, stronger English accessibility, and straightforward flight connections, that tradeoff may be worth it. For those chasing a slower or more scenic rhythm, it may feel too functional.
Key factors:
* Cost of living: Around $1,100 to $1,600 USD per month for a comfortable lifestyle
* Safety: Generally manageable for everyday city living, with the usual big-city awareness needed
* Ease of transportation: Mixed; strong airport access, but daily traffic can be a real drag
* Internet: Usually strongest in business districts, newer condos, and dedicated workspaces, with reliability varying more outside those areas
7. Kuala Lumpur, Malaysia
https://www.youtube.com/watch?v=sLwhC92mF2k&pp=ygUjS3VhbGEgTHVtcHVyLCBNYWxheXNpYSB3YWxraW5nIHRvdXLSBwkJ2QoBhyohjO8%3D
Kuala Lumpur is for the nomad who wants the machine to run smoothly. Not beautifully, not romantically, but efficiently. Few cities in Southeast Asia remove as much friction from daily life. Apartments are modern, English is widely usable, airport access is strong, and Malaysia’s DE Rantau Nomad Pass still positions the country as one of the region’s more deliberate options for remote workers who want a longer legal stay.
That makes KL less of a “finding yourself” destination and more of a “getting things done” destination. It works particularly well for people whose jobs depend on dependable infrastructure: video calls, fast home internet, easy food delivery, coworking options, and neighborhoods that can be chosen almost by operating style. Want a luxury tower near the center? That exists. Want an expat-heavy district with easier routines? That exists too. The city’s scale can feel impersonal, but it also means there is usually a workable answer to whatever logistical problem comes up.
The main tradeoff is emotional rather than practical. Kuala Lumpur is not especially intimate, and it does not offer the beach-town softness of places like Siargao or Hội An. The city is humid, car-oriented in many areas, and sometimes feels as though it was built more for movement than strolling. But for digital nomads who care about reliable systems, comfortable housing, and the freedom to move around the region with ease, Kuala Lumpur remains one of the strongest urban bases in Southeast Asia. The KLIA Ekspres still links KL Sentral to KLIA T1 in 28 minutes, which says a lot about the city’s broader appeal: it is built to keep people moving.
Key factors:
* Cost of living: Around $1,100 USD per month on current nomad cost estimates, though higher-end lifestyles can push that upward
* Safety: Generally workable for daily city life, with standard big-city awareness still needed
* Ease of transportation: Strong by regional standards thanks to rail links and fast airport access, even if some neighborhoods remain car-heavy.
* Internet: One of the easier cities in the region for stable connectivity, especially in modern condos, offices, and coworking spaces
8. Chiang Mai, Thailand
https://www.youtube.com/watch?v=_enulk5K5NY&pp=ygUhQ2hpYW5nIE1haSwgVGhhaWxhbmQgd2Fsa2luZyB0b3Vy
Chiang Mai has been a digital nomad favorite for so long that calling it underrated would be a stretch. Still, it belongs on this list because it remains one of the easiest places in Southeast Asia for someone to start, settle in, and build a remote-work routine without spending much. Current nomad cost estimates still place a solo monthly budget around $1,200, and the city’s appeal continues to rest on the same fundamentals that made it famous in the first place: low everyday costs, dense café and coworking options, and a large built-in community of remote workers.
What separates Chiang Mai from many of the newer lifestyle destinations is how little setup it requires. You do not have to hunt for reliable Wi-Fi, wonder whether there is anyone to meet, or build your entire week around one or two good neighborhoods. The infrastructure for laptop-based living is already there. Thailand’s official e-Visa system also now includes visa-category guidance online, and the broader Destination Thailand Visa framework has become part of the reason more remote workers continue to look at the country for longer stays, even if the exact rules should always be checked directly before applying.
The weakness is not subtle. Burning season is a serious problem, not a minor inconvenience, and in late March 2026 Chiang Mai was again ranked among the world’s most polluted cities, with AQI readings above 220 reported by IQAir and local coverage noting the city hit No. 1 globally on March 30. That means Chiang Mai is best understood as a seasonal base rather than a flawless one. For much of the year it is one of the most practical digital nomad cities in Asia. Between roughly February and April, it can become a place many remote workers actively avoid.
Key factors:
* Cost of living: Around $900 to $1,200 USD per month for a comfortable lifestyle
* Safety: Generally comfortable for everyday living, with normal urban and traffic awareness still needed
* Ease of transportation: Fairly manageable by regional standards, with scooters and ride-hailing widely used
* Internet: One of the easiest cities in the region for remote work setup, with strong availability in cafés, condos, and coworking spaces; Chiang Mai’s long-standing nomad infrastructure remains a major draw.
9. Phnom Penh, Cambodia
https://www.youtube.com/watch?v=5-_l-ogtZ6Y&pp=ygUhUGhub20gUGVuaCwgQ2FtYm9kaWEgd2Fsa2luZyB0b3Vy
Phnom Penh suits a certain kind of remote worker: the one who does not mind a little friction, a little mess, and a little noise if the tradeoff is energy, low costs, and momentum. This is a city that feels commercially alive. Construction cranes are part of the skyline, business happens quickly, and the atmosphere is less polished than Kuala Lumpur or Chiang Mai. For some people, that is exactly the point.
One reason Phnom Penh stays appealing is that it can still offer a comfortable lifestyle at a relatively modest cost. Current nomad cost estimates put solo monthly spending around $1,100 to $1,200, and neighborhoods like BKK1 and Toul Tom Poung continue to attract foreigners who want a practical base with cafés, apartments, and coworking options close together. Cambodia also remains attractive to some longer-stay travelers because ordinary visa extensions have historically been easier to manage than in several neighboring countries, though exact visa routes should always be confirmed before relying on them. The city’s creative-work side is visible too, with places like Workspace 1 at Factory Phnom Penh helping anchor a more entrepreneurial and startup-oriented scene.
That said, Phnom Penh asks more from you than some of the other cities on this list. Petty theft, especially bag and phone snatching from motorcycles, remains a real concern in tourist and expat areas, and several official travel advisories continue to mention it specifically. The city is also hot, traffic-heavy, and not especially green, so anyone looking for calm streets or a restorative beach-town rhythm will probably be happier elsewhere. But for digital nomads who prefer a rougher, more entrepreneurial environment over something curated and comfortable, Phnom Penh still has a strong case.
Key factors:
* Cost of living: Around $1,000 to $1,500 USD per month depending on housing and lifestyle
* Safety: Manageable, but you need to stay alert, especially with phones and bags in traffic-heavy areas.
* Ease of transportation: Usable, though traffic and heat can make daily movement tiring; tuk-tuks and ride-hailing are common
* Internet: Generally solid in central districts, coworking spaces, and modern apartments, with established creative work hubs like Workspace 1 reinforcing the city’s remote-work setup.
10. Kuching, Malaysia
https://www.youtube.com/watch?v=A_F9QFJaOWI&pp=ygUeS3VjaGluZywgTWFsYXlzaWEgd2Fsa2luZyB0b3Vy
Kuching is the sort of place that grows on people quietly. It does not have Chiang Mai’s fame, Kuala Lumpur’s scale, or Siargao’s lifestyle hype. What it does have is calm. For digital nomads who are tired of crowded hubs and want somewhere easier to sink into, Kuching makes a strong case as a slower, lower-pressure base in Southeast Asia.
Part of the appeal is practical. Costs are still relatively low, with current nomad estimates putting monthly living costs in the high-hundreds to low-thousands depending on housing and lifestyle. Malaysia’s DE Rantau framework also now has a Sarawak-specific expansion, DE Rantau Sarawak, which allows qualified digital nomads to stay in Sarawak for up to 12 months with the option to renew for another 12 months. That gives Kuching a more concrete long-stay advantage than many people might expect.
What really sets Kuching apart, though, is the setting. You get a compact city, a gentler pace, and quick access to the kind of nature that most nomad hubs can only offer in weekend doses. That comes with tradeoffs: the community is smaller, nightlife is limited, and the work infrastructure is more understated than in Kuala Lumpur or Chiang Mai. But for remote workers who care more about focus, affordability, and livability than scene, Kuching feels less like a stopover and more like a place you could actually stay.
Key factors:
* Cost of living: Around $800 to $1,100 USD per month is a reasonable target
* Safety: Generally seen as one of the calmer and more manageable urban bases in Malaysia, especially compared with larger capitals.
* Ease of transportation: Fairly manageable within the city, though daily convenience still improves a lot if you use ride-hailing or a scooter.
* Internet: Good enough for standard remote work in solid accommodations and workspaces, though it is less of a standout than Kuala Lumpur or Penang.
Conclusion
For digital nomads, choosing the right base is only part of the equation. The way you work day to day also depends on having gear that is easy to carry, dependable on the move, and flexible enough for everything from café work sessions to long travel days. That is why Acer’s thin and light laptops make sense for this kind of lifestyle, with the Swift lineup built around portability, premium designs, and features aimed at people who need to stay productive while moving between cities. Acer describes the Swift family as “thin and light laptops to get things swiftly done,” and highlights portability, premium design, and AI-ready hardware as core strengths of the line.
If you want a model that fits that same travel-friendly mindset at the higher end, the premium and lightweight laptop worth a closer look is the Acer Swift 16 AI. Acer positions it as a premium design with a thin and light aluminum build, and the product page also highlights features such as an OLED display and the unusually large haptic touchpad, which help it stand out for people who want a more refined remote-work setup without giving up portability.
FAQ
What is the best place in Southeast Asia for digital nomads?
The best place depends on your priorities. Some nomads want a low-cost city, others want beach access, and others care most about fast internet, safety, or a built-in remote-work community.
Is Southeast Asia still good for digital nomads?
Yes. Southeast Asia remains popular with digital nomads because it offers a wide mix of affordable cities, tropical destinations, and established remote-work hubs.
Which Southeast Asian destinations are best for affordable remote work?
Cities like Chiang Mai, Penang, Da Nang, and Kuching are often chosen for their balance of lower living costs and workable day-to-day infrastructure.
Which places are best for beach-loving digital nomads?
Siargao, Da Nang, and Hội An are strong choices if you want to stay productive while living near the coast.
Which places are best for city-loving digital nomads?
Kuala Lumpur, Cebu City, Phnom Penh, and Surabaya are better fits for nomads who prefer a more urban lifestyle with bigger business districts and easier access to modern services.
What should digital nomads look for when choosing a base in Southeast Asia?
The main things to consider are cost of living, internet reliability, safety, transportation, visa rules, and whether you want a quiet lifestyle or a more social nomad scene.
What kind of laptop is best for digital nomads?
A lightweight laptop is usually the best fit because it is easier to carry between apartments, cafés, coworking spaces, and flights. Acer’s thin and light laptops are a natural match for that kind of travel-heavy workflow.
What is a good premium laptop for digital nomads?
If you want something more refined for work and travel, a premium and lightweight laptop like the Acer Swift 16 AI makes sense for digital nomads who want portability without giving up a larger screen and a more polished design.
Recommended Products
Acer Swift 16 AI
Buy Now
Acer Swift Edge 14 AI
Buy Now
Acer Swift X 14
Buy Now