-
Acer Nitro V 15: Best Budget Gaming Laptop in 2025?
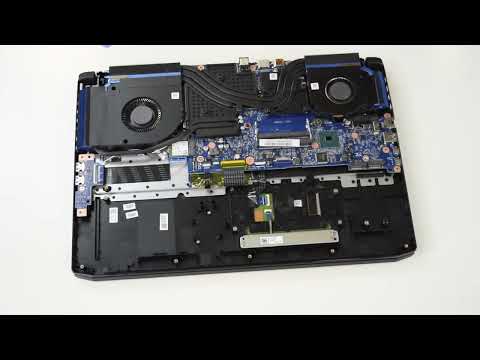
Searching for the best budget gaming laptop? Well congratulations because you’ve just found the best cheap gaming laptop out there, the Acer Nitro V 15. Instead of a cheap gaming laptop, perhaps we should say best value gaming laptop, as the Acer Nitro V 15 is a compact beast that perfectly balances portability and performance.
For committed gamers who demand smooth Full HD play combined with reliable multitasking and ever-stable performance, this isn’t only a good budget gaming laptop. It’s a ticket to jump into gaming missions whenever and wherever you are.
A potent combination of Intel processing, NVIDIA graphics and a 15.6” display, there’s much to discover about the Acer Nitro V 15. So let’s jump right in and take a look at the tech specs of the Acer Nitro V 15 Gaming Laptop - ANV15-52-778V2 currently available for the wallet-friendly price of $1,049.99.
* Operating System: Windows 11 Home
* Processor: Intel® Core™ i7-13620H processor Deca-core
* Processor Speed: 2.40 GHz
* Processor Speed (turbo): 4.90 GHz
* GPU: NVIDIA® GeForce RTX™ 5050 with 8 GB dedicated memory
* Display: 15.6" Full HD (1920 x 1080) 16:9 IPS 165 Hz
* Display Screen Type: Active Matrix TFT LCD
* Display Screen Technology: ComfyView (Matte); In-plane Switching (IPS) Technology
* Memory: 16 GB DDR4 SDRAM
* Memory Slots: 2
* Storage: 512 GB
* Bluetooth: Bluetooth 5.1 or above
* Interfaces/Ports: HDMI, USB x 4, Audio in/out
* Battery Type: 76 Wh
* Maximum Battery Run Time: 8 hours
* Dimensions: 14.3” x 9.4” x 0.92”
* Weight: 4.66 lb
Power and portability
As you can see from these ever-tasty tech-specs, this is truly a prince among budget gaming laptops. Let’s begin with the brains of the beast and see what makes the Acer Nitro V 15 the perfect blend of power and portability. The Intel® Core™ i7-13620H processor is a deca-core processor with 6 performance cores and 4 efficiency cores, topped with a maximum turbo boost of up to 4.9 GHz. Here you have a CPU tailored to balance gaming excess with everyday tasks and productivity. Keep up with whatever you need to get done, from fast-paced gaming, to intense multitasking, and everything in between.
Graphically genius
Still wondering what is the best gaming laptop for you? Well the Acer Nitro V 15’s NVIDIA® GeForce RTX™ 5050 Laptop GPU with dedicated GDDR6 memory may help to sway your opinion about this device! This GPU is ready to drive modern gaming experiences at Full HD resolution, and with dedicated video memory, 8GB of VRAM handles visual workloads without leaning heavily on system RAM. Tied in with the CPU, this graphics card delivers finely tuned graphic excellence across all game genres from FPS to open world exploration.
Full HD Display
A portable full HD display is something to be proud of, and the Acer Nitro V 15’s 5.6-inch Full HD 1920×1080 display is a vision to behold. Fast and speedy play is the name of the game, and this display delivers refresh rates up to 180 Hz and response times up to 3 ms, depending on configuration. Paired with the GPU, the full HD resolution makes whatever you’re playing look fantastic. And from all angles, thanks to IPS technology and Acer’s matte ComfyView surface. Color-wise the Acer Nitro V 15 has got you covered with up to 100% sRGB color. Creators and gamers alike can benefit from the rich color accuracy this laptop delivers.
Memory and storage
All this color and speed mean nothing without solid memory and storage capacity. Well fret not, for the Acer Nitro V 15 has both, in droves. 16 GB of DDR4 memory in a dual-slot configuration provides ample memory as well as flexibility for future upgrades. For all your files and more, 512 GB PCIe NVMe 4.0 SSD means fast game loading, really rapid boot times, and solid responsiveness whatever you’re doing.
Connect with clarity
Connectivity is a must in all devices, and the Acer Nitro V 15 doesn’t disappoint. As you’d expect, this laptop has HDMI®, four USB ports, and an Ethernet port, as well as audio line-in and line-out. Headsets, peripherals, and external displays (if needed) can all be plugged while you play, without any friction.
For occasions where reliability is critical, Gigabit Ethernet lets you get wired in, while everyday connectivity is covered by the Wi-Fi 6 (IEEE 802.11 a/b/g/n/ac/ax) and Bluetooth 5.1 or above. Built-in webcam and mic ensure smooth communications, while Acer’s suite of AI-powered tools including Acer PurifiedVoice™ and PurifiedView™ massively improve call quality.
Professionally portable
Where many budget laptops fall in the trenches, the Acer Nitro V 15 shines. The 76 Wh lithium-ion battery has a maximum runtime of up to 8 hours. That’s a full workday of Nitro V 15 power at your fingertips wherever you venture. The 135 W power adapter delivers fast charging when you need it, but on-the-go gaming, browsing, study, or work is the forte of the Acer Nitro V 15 budget gaming laptop.
In true Nitro style, the V 15 is black and discreet, able to seamlessly blend in a gaming den or professional environment. Weighing a mere 4.66 lbs and with a height of 0.93 inches, a width of 14.3 inches, a depth of 9.4 inches you can carry this laptop to work, school, or gaming meet-ups without ever feeling weighed down!
Best budget choice?
We hope you’ve enjoyed today’s exploration of the Acer Nitro V 15 gaming laptop. A practical, fun choice for gamers who require a balance of power and portability, the Acer Nitro V 15 stands out from the crowd. The Intel Core i7-13620H processor and RTX 5050 GPU provide serious capability for on-the-go Full HD gaming. 15.6” Full HD IPS display, PCIe 4.0 storage, and modern wireless support round out a machine designed for smooth, reliable everyday use. If you’re looking for an affordable gaming laptop with perfected performance, the Acer Nitro V 15 shows that portable hardware can still deliver raw power and versatility. Finally, remember to visit the Acer Store to explore other devices, where students can enjoy 15% off.
Recommended Products
Acer Nitro V 15 (RTX 5050)
Buy Now
Acer Nitro V 16 (RTX 5060)
Buy Now
Acer Nitro V 16S (RTX 5070)
Buy Now
-
Best Throwables to Use in Arc Raiders
If you want to win more fights in ARC Raiders, you need to know which grenades actually make a difference. The game offers a long list of throwables, but many look stronger in the description than they are in real combat. With the 1.3 update changing how explosive damage works, the meta has shifted again, especially for corner fights, anti-ARC bursts, and extraction pressure. This guide breaks down the ten best grenades in ARC Raiders, explains what makes each one useful, and helps you choose the right options for both PvP and PvE so you can avoid wasting resources on tools that will not carry their weight.
10. Gas Grenade
The Gas Grenade is a niche tool, but it becomes dangerous when you understand what it actually does. Instead of dealing damage, it drains the opponent’s stamina, and a player with no stamina cannot perform a normal roll or sprint to reposition. This means the grenade will not force someone out of cover through raw pressure, but it will leave them unable to escape once you start your push. In tight rooms or narrow hallways, it can trap an enemy long enough for you to take control of the fight.
9. Li'l Smoke Grenade
The Li'l Smoke Grenade earns its place on the list because of how consistently useful it is, even with its smaller cloud and shorter duration. It gives you quick, cheap cover when crossing open ground, looting a risky body, or breaking a sniper’s line of sight. While it is not as powerful as the full-size smoke grenade, its low cost makes it easy to bring several into every raid without thinking twice. It is a simple tool, but it adds real safety to almost any situation.
8. Shrapnel Grenade
The Shrapnel Grenade is designed mainly for PvP, where its burst of razor-sharp fragments can punish players holding tight corners or predictable angles. It has a longer fuse and a smaller radius than other options, but the fragmentation effect can catch someone as they move or try to reposition. While its raw damage is lower than a snap blast, it excels as a cheap and reliable area denial tool that forces opponents to give up their position. Used correctly, it can disrupt pushes, break defensive holds, and create openings for you to take control of the fight.
7. Wolfpack Grenade
The Wolfpack Grenade is one of the strongest anti-ARC tools in the game because of how reliably it targets and destroys flying units. When you throw it, the drones break apart and home in on enemies like Wasps, Snitches, Hornets, and especially Rocketeers, often deleting them before they become a threat. It can also contribute solid damage against larger ARC, though its spread makes it less efficient on multi-hitbox bosses. While it excels in PvE, it is essentially wasteful to use in PvP because the rockets do not track players well and offer far less value than cheaper, more flexible grenade options.
6. Heavy Fuse Grenade
The Heavy Fuse Grenade delivers strong explosive damage, but its long fuse time makes it difficult to use effectively. When thrown, it often rolls or bounces into awkward positions, giving opponents plenty of time to move out of the blast radius before it detonates. In PvE, it can still be useful for layering damage under large ARC units, but the delay means it will occasionally miss even stationary enemies. Its power is undeniable when it connects, yet the slow activation and high crafting cost limit its overall practicality compared to faster, more reliable options.
5. Blaze Grenade
The Blaze Grenade was once one of the strongest damage tools in the game, but the 1.3 update reduced its overall effectiveness against ARC units by limiting how many fire ticks can stack on multiple hitboxes. Even after the nerf, it remains a dangerous option in PvP because the spreading fire can trap players in rooms, corners, or narrow hallways, forcing them to take heavy damage if they stay put. The grenade’s value comes from how quickly the fire covers an area, punishing anyone who hesitates or tries to hold a position for too long. It is less efficient for clearing ARC now, but it is still a powerful way to control space and overwhelm players in close-quarters fights.
4. Snap Blast Grenade
The Snap Blast Grenade is a reliable mid-tier explosive that sticks to players, ARC units, or surfaces, which makes its placement much easier to control. Its damage is lower than a heavy fuse grenade, but it activates more consistently and is far cheaper to craft, giving it a strong cost-to-value ratio. Because it adheres to its target, it works well for area denial, corner pressure, or finishing weakened ARC units without worrying about a roll or bounce sending it off course. It lacks the raw power of higher-tier grenades, but its mix of reliability and affordability makes it a dependable choice in most raids.
3. Showstopper
The Showstopper is one of the strongest control grenades in the game because it detonates the instant it hits a target, creating a reliable stun that shuts down both players and ARC units. Against players, the forced stand-still animation lasts long enough to break corner holds, expose defenders, or secure a free opening shot. Against ARC, it can bring Rocketeers out of the sky or lock down dangerous units so you can finish them safely. Its only real drawback is the risk of throwing it too close and stunning yourself, but in the right hands, the Showstopper consistently turns chaotic fights in your favor.
2. Smoke Grenade
The full-sized Smoke Grenade is one of the most versatile utility tools in ARC Raiders, giving you a large, long-lasting cloud that completely breaks line of sight. It is invaluable during extracts because it lets you loot safely, revive teammates, or cross exposed terrain without getting picked off by snipers or third parties. In PvP, it creates chaos by allowing you to close the distance with close-range weapons or reposition before your opponent can react. You can also pair it with a Tagging Grenade to gain vision inside the smoke, letting you track and shoot an enemy who can no longer see you at all. Its wide coverage and long duration make it one of the most consistent and dependable grenades in the game.
1. Trigger 'Nade
The Trigger 'Nade is one of the strongest and most flexible grenades in the game because you can detonate it whenever you choose. This manual trigger lets you throw multiple grenades back-to-back and pop them all at once, creating devastating burst damage that can delete ARC units or strip a player’s shield in an instant. It lands reliably, hits hard, and avoids the problems caused by long fuse timers or unpredictable bounces. Whether you are ambushing a player, finishing a Bastion, or controlling a tight choke point, the Trigger 'Nade consistently delivers some of the highest value you can get from a throwable.
Conclusion
The grenade system in ARC Raiders offers far more depth than it first appears, and choosing the right tool can decide whether you win or lose a fight. Some grenades thrive on raw power, others excel through utility, and a few are only strong when paired with the right combo, like smokes with tagging grenades. Once you understand how each option fits into both PvP and PvE, it becomes easier to build a loadout that matches your playstyle and the challenges of each raid. No matter how you approach the game, mastering these top grenades gives you a noticeable edge and helps you stay one step ahead of both ARC and rival raiders.
For more Arc Raiders tips, guides, and detailed breakdowns, be sure to check out our other articles below:
* How to Level Fast in Arc Raiders: Best EXP Methods
* Arc Raiders Enemy Guide: All ARC Enemies, Weakpoints, Loot, and XP
* Best Skills to Upgrade in Arc Raiders
Recommended Products
Predator Helios 18 AI (RTX 5090)
Buy Now
Predator Helios Neo 18 AI (RTX 5070Ti)
Buy Now
Acer Nitro V 16S (RTX 5070)
Buy Now
-
Is Ubisoft in Trouble? What’s Really Going On in 2025
Ubisoft is facing serious financial pressure in 2025, with its half-year earnings report abruptly postponed just minutes before release, trading of Ubisoft shares temporarily suspended on Euronext, and years of expensive underperforming titles raising fresh questions about whether the company is in financial trouble, nearing bankruptcy, or moving toward a takeover by a larger partner such as Tencent. The concerns have only intensified as Ubisoft’s stock continues to fall, now trading at less than €6.00 per share compared to its all-time high near €100.
The publisher later acknowledged that an accounting adjustment pushed it into breaching a key debt covenant, which forced a last-minute scramble to secure liquidity through Tencent’s €1.16 billion investment in Vantage Studios. Combined with a stock price that has lost more than half its value this year and major releases like Skull and Bones, Star Wars Outlaws, and Assassin’s Creed Shadows falling short of expectations, the sense of crisis is now impossible to ignore.
What is happening with Ubisoft in 2025?
Ubisoft’s situation in 2025 stems from a series of unusually serious financial and operational setbacks that became public in mid-November. The most alarming event was the company’s decision to postpone its half-year earnings call only minutes before it was scheduled to begin. Ubisoft also requested that Euronext halt trading of its shares and bonds, preventing what likely would have been a steep drop in the stock price.
Shortly afterward, Ubisoft confirmed that an internal accounting adjustment affected how revenue and costs were recognized for the period. That adjustment pushed the company into violating a debt covenant tied to its existing loans. When a covenant is breached, lenders can demand renegotiation, impose penalties, or in some cases require repayment. Ubisoft halted trading while it secured additional liquidity and finished correcting its financial statements.
At the same time, investors have been watching major structural changes inside the company. Ubisoft recently moved its most valuable franchises (Assassin’s Creed, Far Cry, and Rainbow Six) into a new subsidiary called Vantage Studios. Tencent invested €1.16 billion for a 25% stake in that entity, giving it partial influence over Ubisoft’s strongest brands. For many analysts, this shift suggests the company is preparing for a sale, a buyout, or a move to go private.
Taken together, the delayed earnings, the debt-related issue, and Ubisoft’s growing reliance on outside capital point to deeper weaknesses in the business: rising development costs, falling revenue, and several major releases that have not met expectations. All of this explains why speculation about financial trouble or a potential acquisition has accelerated so quickly.
Why is Ubisoft in this situation?
Ubisoft’s financial strain did not appear overnight. The company has spent several years dealing with rising development costs, uneven creative direction, and a string of major releases that failed to deliver the sales needed to cover billion-euro production and marketing budgets. As its internal expenses grew, Ubisoft became increasingly dependent on a few core franchises to carry the entire business. When those franchises underperformed, the company’s margins collapsed.
Another issue is the scale of Ubisoft’s operations. With roughly 18,000 employees across dozens of studios, the company carries one of the highest fixed-cost structures in the industry. By comparison, Electronic Arts and Take-Two Interactive generate far more revenue with significantly smaller workforces. Ubisoft’s sprawling structure made it harder to adapt quickly, cut projects that were falling behind, or shift resources toward stronger opportunities.
The company also spent several years attempting to reinvent itself through new service games, cross-media projects, and experimental franchise extensions. Many of these initiatives demanded substantial investment but delivered weak returns. Development timelines grew longer, budgets ballooned, and internal teams were spread thin across too many projects at once.
These financial pressures were then compounded by strategic misfires. Ubisoft invested heavily in expensive AAA games that were expected to anchor its fiscal years, only for those titles to miss expectations. With each underperformance, the company had less cash to reinvest, more debt to service, and greater dependence on outside investors. This created a cycle where one weak launch made it harder to recover before the next one arrived.
All of these factors set the stage for what we are seeing now: a publisher that is carrying too much cost, generating too little revenue, and relying on external capital to stabilize its balance sheet while it tries to reorganize.
Which Ubisoft games have underperformed in recent years?
Ubisoft’s current financial pressure is closely tied to a series of high-budget releases that failed to meet sales expectations. These titles were meant to anchor multiple fiscal years, but instead they delivered weaker-than-planned revenue while absorbing enormous development and marketing costs.
* Skull and Bones: After more than a decade in development and several complete reboots, Skull and Bones launched with one of the largest budgets in Ubisoft’s history. Despite that investment, the game struggled to find an audience, and its sales dropped quickly. Today it can be found at steep discounts, and player engagement has fallen far below what a live-service title needs to remain profitable.
* Star Wars Outlaws: Ubisoft poured unprecedented marketing resources into Star Wars Outlaws, hoping the Star Wars brand would deliver a breakout hit. While the game sold moderately well at launch, it fell short of internal expectations. The DLC failed to bring players back, and the long-term revenue projections for the title were revised downward soon after release.
* Assassin’s Creed Shadows: Although Assassin’s Creed Shadows sold millions of copies, it underperformed relative to its budget. Among Ubisoft’s last five major Assassin’s Creed releases, Shadows carried the highest production cost but delivered the lowest early sales. This gap between investment and return has been particularly damaging because Assassin’s Creed has historically been Ubisoft’s most reliable revenue source.
* Avatar: Frontiers of Pandora: Despite the popularity of the Avatar film franchise, the game launched to muted interest. Engagement dropped quickly even after major updates, and the title failed to produce the long-tail revenue Ubisoft expected from a licensed open-world release.
* XDefiant: The company had hoped XDefiant would compete directly with Call of Duty, but the game’s launch was overshadowed by other FPS releases. Player numbers dropped rapidly, and server support wound down sooner than expected.
Combined, these underperforming games consumed massive budgets without producing the steady revenue needed to support Ubisoft’s large workforce and multi-site development model. Each shortfall increased financial pressure, inflated debt, and made the company more dependent on outside investors to cover operational costs.
What is likely to happen to Ubisoft now?
The abrupt earnings delay, the debt covenant breach, and the ongoing stock decline have sparked intense speculation about Ubisoft’s future. While nothing is confirmed, several realistic scenarios are now being discussed by analysts, investors, and industry observers.
1. A Tencent-led buyout becomes more likely
Tencent already holds a 25% stake in Vantage Studios, the Ubisoft-controlled entity that manages Assassin’s Creed, Far Cry, and Rainbow Six. This investment gives Tencent a foothold in Ubisoft’s most valuable properties.
If Ubisoft’s liquidity issues continue, Tencent is in a strong position to move from strategic partner to majority owner. The company also has an existing relationship with the Guillemot family, which makes this path both practical and likely.
2. A Saudi PIF acquisition or a joint take-private deal
Saudi Arabia’s Public Investment Fund (PIF) has invested heavily in the global games industry, including major stakes in Nintendo and Embracer Group, along with its recent fifty-five billion dollar move to take Electronic Arts private.
PIF has also supported recent Ubisoft projects, so a deeper partnership is possible. Some analysts believe a joint deal with the Guillemot family, potentially taking Ubisoft private, could emerge if the company needs immediate liquidity.
3. Ubisoft restructures aggressively and attempts to remain independent
Another path is for Ubisoft to pursue a major internal overhaul. This could mean consolidating studios, cutting unannounced projects, and reducing its roughly 18,000-person workforce to bring operating costs closer to current revenue levels.
While this would preserve independence, it would require difficult cuts at a scale Ubisoft has avoided in the past.
4. A sale of non-core assets
If a full acquisition does not materialize, Ubisoft may look to sell or license certain franchises, technologies, or regional studios to raise cash. Several game publishers have stabilized their finances through targeted asset sales, and Ubisoft could follow that model.
5. A complete return to private ownership
Public markets have punished the company’s stock, which is now trading near ~€6.00 per share compared to a peak close to €100. A take-private deal could appeal to the Guillemot family, Tencent, PIF, or a consortium of partners who prefer long-term restructuring without quarterly pressure.
Ubisoft’s future?
Ubisoft’s sudden earnings delay, its breach of a debt covenant, and the continued decline of its stock have all intensified speculation about the company’s future. The most discussed scenario is a potential takeover, with Tencent seen as the leading candidate because it already owns a 25 percent stake in Vantage Studios and holds a strategic position around Ubisoft’s most valuable franchises. The Saudi Public Investment Fund is another possibility, given its recent large-scale gaming investments and its growing involvement in Ubisoft projects. A joint deal that takes Ubisoft private is also on the table, especially if the company needs immediate liquidity to stabilize its balance sheet.
If no acquisition occurs, Ubisoft may face significant internal restructuring. This could involve consolidating studios, cutting projects, and reducing the company’s roughly 18,000-person workforce to bring costs back in line with revenue. Selling or licensing non-core assets is another option that could provide short-term cash. With the stock now trading near ~€6.00 per share, a transition to private ownership may ultimately be the most practical path. No matter which direction the company takes, it is clear that Ubisoft is heading toward a major turning point, and it is unlikely to look the same a year from now.
Recommended Products
Predator Triton 14 AI (RTX 5070)
Buy Now
Acer Nitro V 16 (RTX 5060)
Buy Now
Acer Nitro 60 (RTX 5070Ti)
Buy Now
-
Why You Should Remove Image Metadata Before Sharing Photos and How to Do It
Before you upload your next photo, join us to discover why you should remove the hidden image metadata inside it, and how to clean it safely on Windows 11 or with dedicated tools. It may sound like the stuff of spy movies, but there really is a bundle of info hidden inside each and every image file.
Image metadata often includes exact GPS coordinates of where the image was taken, when it was taken, and even the device used! While this info can be useful for organizing your photo library, it may reveal more about you than you’re comfortable with. Don’t panic, stick with us and learn how to view and remove image metadata to protect your privacy when you share photos online.
What is image metadata?
As we mentioned above, image metadata is the hidden info stored in a photo file. This invisible information is automatically embedded in every photo you take on digital devices. The most common standard is EXIF metadata, which stores details of the date and time the photo was taken, as well as the camera model, shutter speed, ISO, and even lens type. Your smartphone likely also records GPS coordinates, which can be used to pinpoint the exact spot where an image was captured.
If you edit your own photos, then editing software can add additional metadata like color profiles and copyright info. While metadata is undeniably useful for organizing your library and supporting editing workflows, it can also reveal more than you intend. Let’s take a closer look at why removing image metadata before sharing your photos is a wise move.
Why remove image metadata?
Privacy and safety are the primary reasons you should remove image metadata before posting your photos online! GPS data reveals locations like your home, office, or even your kid’s school. Add timestamps to this, and metadata becomes a potent cocktail of information that can hand stalkers or other nefarious individuals' way more insight into your life than you ever intended to share.
On top of personal privacy, removing metadata should be a part of your digital hygiene regime. Every unnecessary detail you share online increases your digital footprint, so removing metadata aligns with today’s cybersecurity best practices. Even if you’ve got no enemies, and you want the world to see your photos, you’re better off preserving a stroke of anonymity by removing metadata.
When you should wipe your image's properties
Many popular platforms including Facebook and Instagram strip most EXIF data, including GPS metadata (location) when photos are uploaded. While this data may be automatically stripped before posting, platforms may preserve metadata internally. We recommend that any image you post publicly, send to strangers, or use in sensitive contexts (marketplace, public groups) should be cleansed of metadata before uploading. Remember as well that other methods of sending data such as messaging apps, email, cloud albums, and AirDrop don’t wipe metadata from images.
When not to worry about metadata
Photos stored privately on your devices or cloud accounts don’t need to have their metadata wiped. If you’re sharing images in trusted private chats like family WhatsApp groups then don’t worry about metadata. But remember, if someone forwards your photo to a nefarious individual, the metadata you left in the file will travel with it.
Let’s not forget that metadata is actually intended to help photographers access image info. Metadata provides valuable information including camera settings. On top of this, it helps users organize their photo albums by time and location, and marks RAW images that require metadata for editing.
How to see image metadata on Windows 11
Before you strip your images of all their metadata, it helps to know exactly what information your photo is carrying. Thankfully Windows 11 makes it easy to view a file’s metadata directly from File Explorer:
* Right-click the photo file in File Explorer.
* Select Properties.
* Open the Details tab.
* You’ll see fields such as:* Date taken
* Camera model
* Software
* Dimensions and resolution
* GPS coordinates (if present)
How to remove metadata from images on Windows 11
Once you’ve deciphered what your photos reveal, removing the metadata is simple. Windows 11 includes a built-in tool that lets you remove sensitive details in a few clicks, as follows:
* Right-click the image
* Select Properties
* Open the Details tab.
* Select Remove Properties and Personal Information at the bottom.
* You can choose:* Create a copy with all possible metadata removed, or
* Remove the following properties from this file and select all or individual fields to delete (date taken, camera model, GPS).
* Windows can remove most metadata from JPEG and PNG files, but RAW formats (.CR2, .NEF, .ARW) may require specialized tools.
Other tools to remove metadata
A simple internet search will offer endless websites and tools offering to find and remove the metadata from your images. So, if you crave even more control over what your images reveal, a range of metadata cleaning tools can help you discover, edit, or wipe image metadata before sharing. These apps go beyond Windows 11’s built-in options, providing deeper customization options and stronger privacy protection.
ExifTool (Windows/macOS/Linux). The golden standard for metadata removal, this cross-platform, powerful, fast, flexible and customizable command-line tool offers complete metadata inspection and removal. Preferred choice of technical users, security pros, and photographers, ExifTool by Phil Harvey helps users read, write and edit meta information.
GIMP (Windows/macOS/Linux). Bring out GIMP, the free and open source GNU image manipulation program that’s been around for 30 years. As well as editing image metadata, GIMP can be tasked with photo retouching, image composition and image authoring.
Photo Exif Editor to view, edit or remove EXIF metadata (including GPS) from their photos. iOS users may want to check out Exif Metadata to swiftly and easily view, edit and remove image metadata.
Mind your metadata
We hope you’ve enjoyed discovering why you should remove image metadata before sharing photos. It really is a small step that delivers a huge boost to your digital privacy. If you’re sharing photos on social media or posting listings online, stripping metadata ensures you only share what you intend to, and nothing more.
With a few easy clicks, Windows 11’s built-in tools and other metadata-cleaning apps can protect you and your family. In a connected world where every meta detail matters, keeping the photos you share online metadata-free is one of the easiest ways to stay in control and secure.
Recommended Products
Acer Swift Edge 14 AI
Buy Now
Acer Aspire 14 AI
Buy Now
Acer Swift Go 14
Buy Now
-
Why RAM Prices Are Surging in 2025: What’s Really Driving the Spike
Memory prices have risen sharply in 2025, surprising PC builders, laptop shoppers, and companies that depend on predictable hardware costs. DDR4 and DDR5 modules cost far more than they did just a year ago, and the increases show no sign of slowing. What looks like a simple shortage is actually the result of deeper structural changes across the semiconductor industry.
This article explains what is happening, why it is happening, who is feeling the impact, how long the situation may last, and what consumers and businesses can do now.
What is happening to RAM prices in 2025?
RAM prices have climbed across every major category. DDR4, DDR5, LPDDR5 for mobile devices, and even server-class memory have all become more expensive. In many regions, consumer-grade memory kits now cost two or even three times more than they did in 2023 or early 2024.
At the same time, memory availability is inconsistent. Retailers report that high-speed kits sell out faster. Laptop manufacturers are facing higher bill-of-materials costs. Even large enterprise buyers have reported partial fulfillment of bulk memory orders.
In short, demand for memory remains high, supply remains tight, and the market has shifted in favor of suppliers.
Why RAM has become so expensive this year
RAM prices have surged in 2025 because demand for advanced memory has grown much faster than supply can keep up. Industry data shows how dramatic this shift has been. TrendForce reports that many DDR5 modules have increased by 120 to 200 percent compared with early 2025, while broader DRAM pricing indexes have climbed nearly 50 percent year to date. Certain contract prices for memory chips have also risen by 30 to 60 percent in only a few months. These increases reveal how tight the market has become across consumer, mobile, and server segments.
Several forces are driving the spike:
1. AI demand is consuming the memory supply
The rise of artificial intelligence is the single biggest driver behind the shortage. Modern AI data centers rely heavily on high bandwidth memory, or HBM. This stacked, ultra-fast memory is essential for training and running large models. Since HBM relies on the same foundational materials as DDR4 and DDR5, manufacturers are shifting their capacity toward HBM because it offers higher revenue and long-term demand certainty.
When production capacity shifts toward HBM, fewer wafers and fewer fabrication lines are left for standard DRAM.
2. Wafers are limited and expensive
All DRAM begins with 300 mm semiconductor wafers. These wafers are expensive, difficult to produce, and available only from a few global suppliers. As AI companies place massive long-term orders, wafer supply becomes stretched.
A limited wafer supply creates two problems:
* There are not enough wafers to satisfy every DRAM product line.
* The cost of each wafer increases, which raises the baseline cost of all memory.
Even if demand from consumers stayed the same, wafer scarcity alone would push prices upward.
3. Manufacturers are managing supply to protect pricing
For years, the memory market suffered from oversupply, which caused prices to crash. In response, manufacturers adopted a more controlled approach. They now scale production carefully to avoid large inventory buildups. This helps stabilize profits but keeps prices high.
Because all three major DRAM manufacturers are using similar strategies, the market has shifted toward steady, elevated pricing rather than boom-and-bust cycles.
4. DDR4 is being phased out
DDR4 production was already declining as the industry transitioned toward DDR5. With wafer supply under pressure and HBM taking priority, manufacturers have accelerated the phase-out. Fewer DDR4 production lines means lower availability and higher prices, even for older systems.
5. Devices require more memory than before
The rise of AI in consumer devices, the growth of handheld gaming PCs, and new requirements in Windows 11 have all increased memory consumption. Many modern laptops ship with 16 GB or 32 GB. Phones increasingly use more RAM to support on-device AI features.
This growing demand collides with limited supply and pushes prices higher.
6. HBM packaging is slow and difficult
Even if manufacturers wanted to expand HBM production, packaging remains a bottleneck. HBM uses advanced through-silicon vias and stacked layers that require specialized packaging facilities. Only a handful of plants worldwide can perform this work at scale.
Since packaging cannot expand quickly, HBM supply remains tight, which in turn keeps pressure on overall DRAM supply.
Who is being affected by the global DRAM shortage
The current memory market affects almost every part of the technology ecosystem, but in different ways.
1. Consumers building or upgrading PCs
Builders who planned to upgrade from 16 GB to 32 GB, or move to higher speed DDR5 kits, now face much higher costs. Entry-level kits cost more than before, and high-end kits often sell out.
2. Laptop buyers
Laptop manufacturers must absorb higher component costs, and those increases often appear in final retail pricing. Even models with soldered memory are affected because DRAM cost influences the total system cost.
3. Small and mid-sized businesses
Companies that refresh hardware regularly or run memory-intensive workloads face higher upgrade budgets. Even organizations that rely on cloud services may see costs rise because cloud providers are also paying more for memory.
4. Enterprise and data center operators
HBM shortages and server DRAM constraints affect data center expansion plans. Some large customers have reported reduced fulfillment of bulk memory orders, which can delay deployment timelines.
5. Gamers and creative professionals
High performance workloads such as 4K editing, 3D rendering, and modern AAA gaming often require 32 GB or more. Higher memory prices make these upgrades more expensive.
How long high RAM prices are expected to last
Based on current industry conditions, elevated memory prices are likely to persist through all of 2025 and at least into early or mid-2026. Several reasons support this timeline:
* Large AI companies have already placed long-term HBM orders that last several years.
* Wafer production capacity cannot scale quickly because it requires new fabs and new suppliers.
* HBM packaging remains the slowest part of the supply chain.
* The DDR4 phase-out is accelerating, not slowing.
* DRAM manufacturers have no incentive to increase supply faster than demand.
New fabrication facilities in Japan, Taiwan, South Korea, and the United States may help, but most will not reach high-volume output until late 2026 or 2027.
Short-term discounts may appear during sales events, but a major price correction is unlikely in the near future.
What consumers and businesses can do to manage rising memory costs
While the situation is not ideal, there are practical steps that buyers can take to reduce the impact of rising memory prices.
1. Buy sooner rather than later
Prices have trended upward month after month. Delaying upgrades often results in paying more, especially for high-speed DDR5 kits.
2. Consider total system value, not just memory costs
For consumers building PCs, it may be better to choose a more balanced set of components rather than pushing all spending toward memory capacity. Many gaming and productivity workloads still run well with 16 GB or 32 GB, depending on the use case.
3. Take advantage of seasonal sales
Retailers may still offer occasional promotions, especially around major shopping periods. Even modest discounts can matter in a high-price market.
4. Businesses should plan hardware refresh cycles early
Companies that refresh equipment every two to three years should budget for higher DRAM costs. Early procurement can reduce the risk of sudden price jumps.
5. Explore complete systems instead of component upgrades
Sometimes a laptop or desktop with pre-installed memory offers better value than buying memory separately. For users considering a new system, the Acer Store offers desktops, laptops, and workstations with memory configurations that may cost less than separate component upgrades.
Final thoughts
The 2025 memory market reflects a major industry shift driven by AI demand, wafer constraints, controlled production strategies, and rising memory requirements across modern devices. Together, these forces have pushed RAM prices to some of the highest levels seen in recent years.
While supply conditions are expected to improve over time, higher memory pricing is likely to persist throughout the year. For consumers and businesses planning a hardware upgrade, delaying a purchase may result in paying more for comparable performance as component costs continue to climb.
In this environment, buying a pre-configured system can still offer practical value. Although prices have already begun to reflect higher memory costs, gaming desktops and laptops available through the Acer Store have not yet reached the steepest part of the current pricing cycle. Compared with building or upgrading a PC component by component, system pricing remains more predictable as RAM costs continue to trend upward.
Acer’s Nitro and Predator gaming lines are well positioned under these conditions. These systems ship with balanced CPU, GPU, and memory configurations designed to handle modern games and creative workloads out of the box, reducing the need for immediate upgrades. As memory prices rise further throughout 2025, purchasing a complete gaming PC or laptop now can help buyers secure strong performance without absorbing additional component-driven price increases later in the year.
For users considering an upgrade, the current pricing window represents a reasonable opportunity to move before memory costs place further pressure on overall system prices.
Recommended Products
Acer Nitro V 16 (RTX 5060)
Buy Now
Predator Helios Neo 18 AI (RTX 5070Ti)
Buy Now
Predator Helios 18 AI (RTX 5080)
Buy Now
-
How to Use AI to Assist You with Christmas Shopping This Year
This article will examine how AI can assist with your Christmas shopping this year, including generating personalized gift ideas and comparing prices so you can get the best deal. AI is transforming some fundamental areas of life as we know it, but did you know that it can also help with your Christmas shopping? There is no need to rack your brains for ideas this Christmas season, as AI can help you pick the perfect gifts for your budget. Studies show that 44% of consumers use AI to compare products, while 62% found AI-powered chatbots helpful during online shopping sprees. Here are some more ways you can use AI for your Christmas shopping.
1. Generate personalized gift ideas
No idea what to buy the person who has everything? No problem! AI tools like ChatGPT can generate personalized gift ideas based on someone’s hobbies, age, interests, or lifestyle. Just enter a prompt, such as “Christmas gift ideas for a 55-year-old male who enjoys fishing” and let AI do the rest. You can tweak the prompt or ask the AI tool for more ideas if the suggestions don’t quite hit the spot.
2. Compare prices across stores
If you want the most competitive prices but don’t have time to compare between retailers, AI tools can help. You can ask your favorite AI chatbot to compare prices across stores so you can always get the best deal from the comfort of your own home, or install browser extensions like Peel to compare prices from over 50,000 online stores as you shop.
3. Track price drops
Price-checking tools like Automatio.ai and CatchaDrop track price drops and notify you when an item becomes cheaper or reaches your target price. Many such AI-powered tools work across multiple online stores instead of one specific retailer, letting you choose from a wider price pool.
4. Summarize product reviews
Instead of trawling through hundreds of product reviews to see if you are making the right purchase this Christmas, you can ask AI to do it for you. Chatbots like ChatGPT or Gemini can summarize product reviews if you copy and paste them into the chat box and enter a prompt like “summarize the key themes, pros, cons, and any complaints.” There are also browser extensions that scrape and summarize product reviews without copying and pasting.
5. Recommend alternatives
AI tools and shopping assistants like lindy.ai can recommend alternatives if an item is out of stock or overpriced, so you don’t have to scramble for more last-minute gift ideas. If your ideal item is completely unavailable, you can ask an AI tool like Gemini to find gifts with similar features, color, sentiment, or price as the original.
6. Match gifts to your budget
Getting gifts that match your budget doesn’t have to be a chore. AI tools can help you divide your holiday spending so you can stick to your budget without forgoing gifts. Simply enter your budget into your favorite AI chatbot using prompts like “show me gift ideas under USD $30” or “Christmas gift ideas for my cat-loving sister between USD $10 - $20” to set your desired price range.
7. Find coupons and active promo codes
Coupons and promo codes aren’t just for in-store shopping. Many online retailers also accept coupons and discount codes, but they can be hard to find through standard searches. AI coupon finders like CouponGPT find coupons and promo codes from various sources, so you don’t have to.
8. Spot fake reviews or low-quality products
We know by now that AI tools can compare prices, recommend alternative products, and help us stick to our budget, but did you know that they can also spot fake reviews or low quality products? When detecting fake reviews, AI tools like ReviewMeta look for generic phrases or unnatural praise that we might miss, and they can also compare across different platforms to ensure reviews are consistent. If something seems too good to be true, just ask AI.
9. Create shopping lists and timelines
Make sure you never miss a shipping deadline again with AI tools that create shopping lists and timelines. After all, it’s no good trying to order a gift in time for Christmas if it won’t arrive until mid-January. Try inputting your ideal gift and target delivery date into tools like Google Gemini, and it will calculate the latest order date, preferred shipping method, and international shipping information. Then ask it to convert it into a timeline and send that to your calendar of choice to receive updates.
10. Write personalized holiday messages to go with your gifts
AI can generate personalized messages to help you add a personal touch to your Christmas gifts this year. To do this, tell your favorite chatbot who you would like to write the message to, for example, “write a short festive note for my mom”, and let AI do the rest.
Streamline your Christmas shopping with AI
Imagine if you could find the perfect Christmas gifts for your loved ones without stressing over finding the cheapest deal, missing shipping deadlines, or writing a nice personalized note. Well, with AI tools, you can! Consider AI your personal assistant this Christmas and let it do the brainwork so you can focus on bringing the festive cheer. Try out some of the tips within this article, and check out this article for more ideas about how you can use AI-powered tools. If you’re looking for a new laptop, monitor, or accessories this Christmas, check out the Acer store and get an additional 15% student discount if eligible.
Recommended Products
Acer Swift Edge 14 AI
Buy Now
Acer Aspire 14 AI
Buy Now
Acer Swift Go 14 AI
Buy Now