Acer
Predator
ConceptD
Planet9
S300:如何設定可攜式Wi-Fi 無線基地台,讓筆電上網? - Acer Community
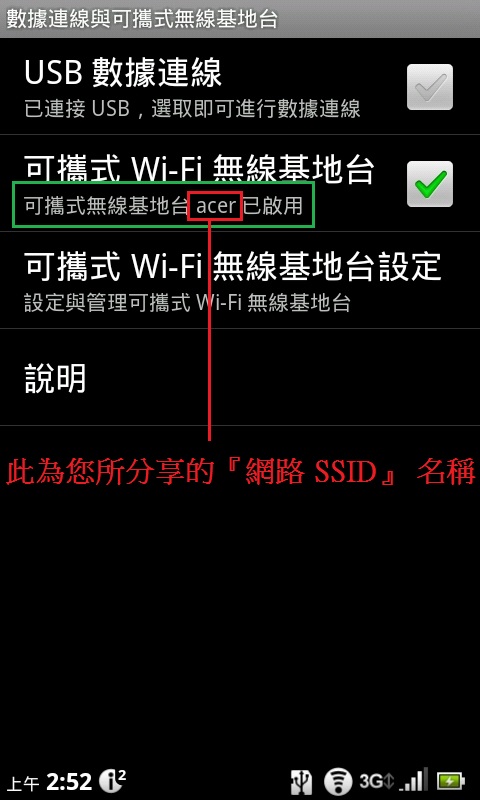
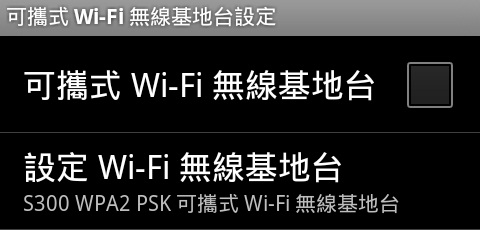
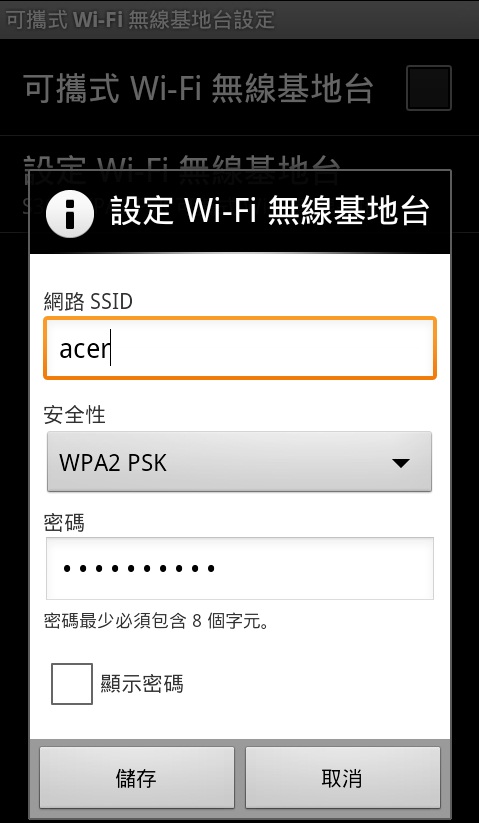
<main> <article class="userContent"> <h3></h3> <p>問題描述:</p> <p>如何設定數據機,讓筆電上網?</p> <p>解說:</p> <p>Step 1</p> <p>請點選設定 <img border="0" alt="CC.jpg" src="https://twcsd.acer.com.tw/acerdl/upload/tbFaq/F201104108/CC.jpg" width="46" height="66" class="embedImage-img importedEmbed-img"></img></p> <p><br><br> <img border="0" alt="2.jpg" src="https://twcsd.acer.com.tw/acerdl/upload/tbFaq/F201104108/2.jpg" width="300" height="500" class="embedImage-img importedEmbed-img"></img></p> <p>Step 2. 進入設定後,請點選『無線與網路』。<br><br> <span id="ctl00_ContentPlaceHolder1_contents"></span></p> <p> <img border="0" alt="4.jpg" src="https://twcsd.acer.com.tw/acerdl/upload/tbFaq/F201104108/4.jpg" width="300" height="500" class="embedImage-img importedEmbed-img"></img></p> <p>Step 3. 進入無線與網路後,請點選『數據連線與可攜式無線基地台』。<br><br> <img border="0" alt="5.jpg" src="https://twcsd.acer.com.tw/acerdl/upload/tbFaq/F201104108/5.jpg" width="300" height="500" class="embedImage-img importedEmbed-img"></img></p> <p>Step 4. 進入後,請點選『可攜式 Wi-Fi 無線基地台』即可啟動該 Wi--FI 分享功能</p> <p> <img border="0" alt="6.jpg" src="https://twcsd.acer.com.tw/acerdl/upload/tbFaq/F201104108/6.jpg" width="300" height="500" class="embedImage-img importedEmbed-img"></img> <img border="0" alt="7.jpg" src="https://twcsd.acer.com.tw/acerdl/upload/tbFaq/F201104108/7.jpg" width="300" height="500" class="embedImage-img importedEmbed-img"></img></p> <p>Step 5. 此時應可發現『數據連線與可攜式無線基地台』已可點選,請點選進入該設定,<br><br> 而您也可以在此檢視您目前手機所設定『可攜式無線基地台』名稱為何。<br><br> <img border="0" alt="8.jpg" src="https://twcsd.acer.com.tw/acerdl/upload/tbFaq/F201104108/8.jpg" width="300" height="500" class="embedImage-img importedEmbed-img"></img> <img border="0" alt="SSID.jpg" src="https://twcsd.acer.com.tw/acerdl/upload/tbFaq/F201104108/SSID.jpg" width="300" height="500" class="embedImage-img importedEmbed-img"></img></p> <p>Step 6. 此時取消勾選『可攜式Wi-Fi 無線基地台』,請點選『設定 Wi-Fi 無線基地台』進行相關設定。<br><br> <img border="0" alt="F201205199-1.jpg" src="https://twcsd.acer.com.tw/acerdl/upload/tbFaq/F201205199/F201205199-1.jpg" width="480" height="230" class="embedImage-img importedEmbed-img"></img></p> <p>Step 7. 此時即可更改網路 SSID 及是否選擇加密方式可選『WPA2 PSK』,點選『儲存』。<br><br> <img border="0" alt="10.jpg" src="https://twcsd.acer.com.tw/acerdl/upload/tbFaq/F201104108/10.jpg" width="300" height="500" class="embedImage-img importedEmbed-img"></img> </p> <p> <img border="0" alt="F201205199-2.jpg" src="https://twcsd.acer.com.tw/acerdl/upload/tbFaq/F201205199/F201205199-2.jpg" width="479" height="823" class="embedImage-img importedEmbed-img"></img></p> <meta content="#ICONIA SMART (S300),#ICONIA SMART (S300)"></meta> </article> </main>
Videos that might interest you