Acer
Predator
ConceptD
Planet9
Lsi MegaRAID RAID Card設定步驟(6G RAID Card--快速鍵Ctrl+H) - Acer Community
<main> <article class="userContent"> <h3></h3> <p style="text-align: justify;"><span style="font-family: Arial;">此篇設定步驟僅限於快速鍵為<span style="color: #0000ff;">Ctrl+H</span>的RAID Card設定步驟說明(6G RAID Card有LSI MegaRAID 9240-4i,9260-8i,9250-16i)</span></p> <p><span style="font-family: Arial;">
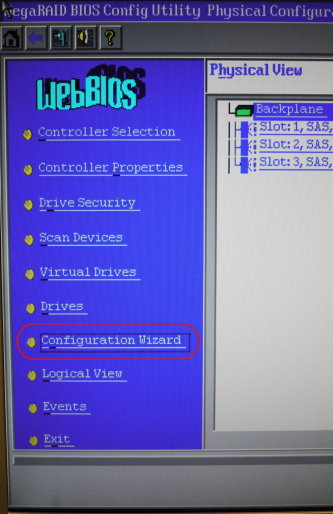
1.在開機畫面中看到Ctrl+H快速鍵,請按下Ctrl+H進入下面畫面</span></p> <p><img border="0" alt="P1060794.JPG" src="https://twcsd.acer.com.tw/acerdl/upload/tbFaq/F201107042/P1060794.JPG" width="535" height="368" class="embedImage-img importedEmbed-img"></img></p> <p><span style="font-family: Arial;">2.請選取Configuration Wizard</span></p> <p><img border="0" alt="P1060796.JPG" src="https://twcsd.acer.com.tw/acerdl/upload/tbFaq/F201107042/P1060796.JPG" width="333" height="514" class="embedImage-img importedEmbed-img"></img></p> <p><span style="font-family: Arial;">3.請利用Tab鍵選到[New Configuration] 並跳到Next</span></p> <p><img border="0" alt="P1060797.JPG" src="https://twcsd.acer.com.tw/acerdl/upload/tbFaq/F201107042/P1060797.JPG" width="519" height="409" class="embedImage-img importedEmbed-img"></img></p> <p><span style="font-family: Arial;">
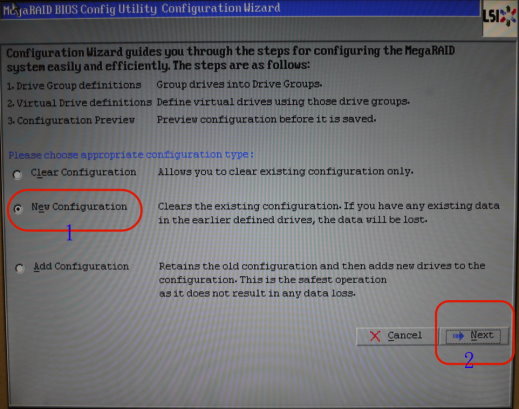
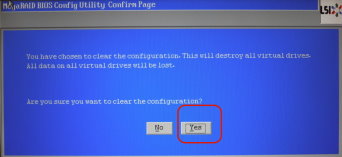
4.設定畫面會提醒你,接下來的動作會清除您之前的所有設定值,請確定您要重新建置RAID 規劃後,按下[Yes]</span></p> <p><img border="0" alt="P1060798.JPG" src="https://twcsd.acer.com.tw/acerdl/upload/tbFaq/F201107042/P1060798.JPG" width="342" height="157" class="embedImage-img importedEmbed-img"></img></p> <p><span style="font-family: Arial;">
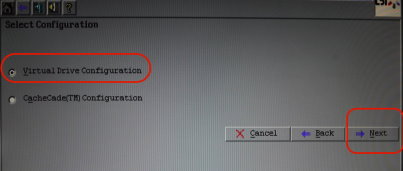
5.按下[Yes]後會出現如下畫面,請選取[Virtual Device Configuration]並按[Next]</span></p> <p><img border="0" alt="P1060799.JPG" src="https://twcsd.acer.com.tw/acerdl/upload/tbFaq/F201107042/P1060799.JPG" width="403" height="171" class="embedImage-img importedEmbed-img"></img></p> <p><span style="font-family: Arial;">
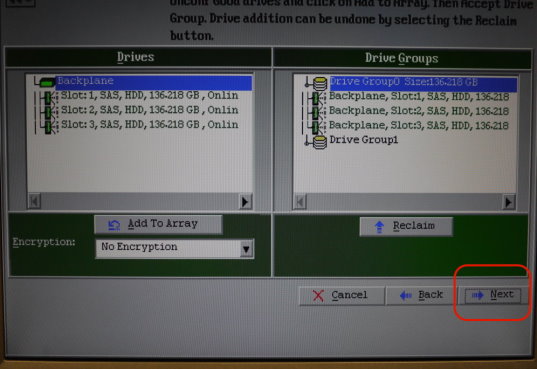
6.請利用Tab鍵,一一將左邊列出來的硬碟加入到右邊的Drive Groups</span></p> <p><span style="font-family: Arial;"> 先選取硬碟後,按下[Add To Array],則硬碟就會移到右邊方框中</span></p> <p><img border="0" alt="P1060801.JPG" src="https://twcsd.acer.com.tw/acerdl/upload/tbFaq/F201107042/P1060801.JPG" width="502" height="375" class="embedImage-img importedEmbed-img"></img></p> <p><span style="font-family: Arial;">7.確定要做RAID的硬碟全被選到右邊[Drive Groups]框中後,按下[Accept DG],即會將這些硬碟全部規劃成一個RAID</span></p> <p><img border="0" alt="P1060804.JPG" src="https://twcsd.acer.com.tw/acerdl/upload/tbFaq/F201107042/P1060804.JPG" width="507" height="308" class="embedImage-img importedEmbed-img"></img></p> <p><span style="font-family: Arial;">
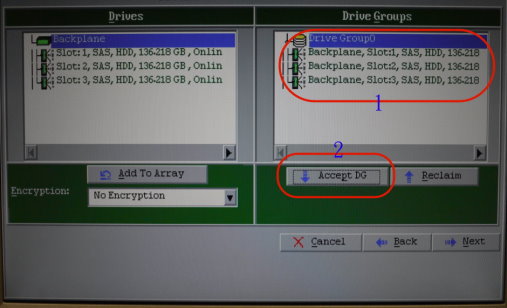
8.按下[Accept DG]後,畫面會如下:
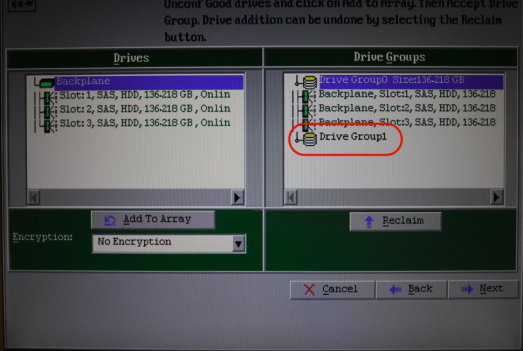
</span></p> <p><img border="0" alt="P1060805.JPG" src="https://twcsd.acer.com.tw/acerdl/upload/tbFaq/F201107042/P1060805.JPG" width="523" height="351" class="embedImage-img importedEmbed-img"></img></p> <p><span style="font-family: Arial;">9.確定無誤後,請按[Next]</span></p> <p><img border="0" alt="P1060806.JPG" src="https://twcsd.acer.com.tw/acerdl/upload/tbFaq/F201107042/P1060806.JPG" width="537" height="369" class="embedImage-img importedEmbed-img"></img></p> <p><span style="font-family: Arial;">
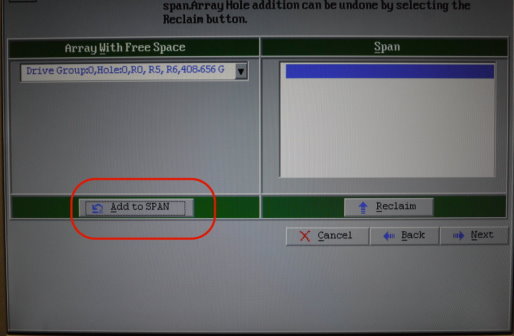
10.接下來出現如下畫面,請按[Add to SPAN]</span></p> <p><img border="0" alt="P1060807.JPG" src="https://twcsd.acer.com.tw/acerdl/upload/tbFaq/F201107042/P1060807.JPG" width="514" height="336" class="embedImage-img importedEmbed-img"></img></p> <p><span style="font-family: Arial;">
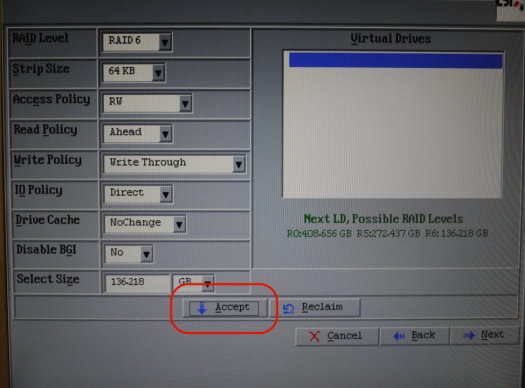
11.按下[Next]後會出現如下畫面,即可設定RAID Level and RAID相關參數</span></p> <p><span style="font-family: Arial;"> RAID Level選單是由系統根據你選幾顆硬碟,可做哪些RAID Type列出選單</span></p> <p><img border="0" alt="P1060808.JPG" src="https://twcsd.acer.com.tw/acerdl/upload/tbFaq/F201107042/P1060808.JPG" width="507" height="362" class="embedImage-img importedEmbed-img"></img></p> <p><span style="font-family: Arial;">12.參數選取設定確定後,請按[Accept]</span></p> <p><img border="0" alt="P1060809.JPG" src="https://twcsd.acer.com.tw/acerdl/upload/tbFaq/F201107042/P1060809.JPG" width="525" height="388" class="embedImage-img importedEmbed-img"></img></p> <p><span style="font-family: Arial;">
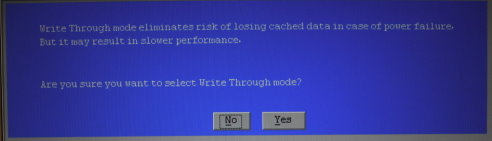
13.系統會提醒您Write Policy的設定值(有Write Through 及Write Back)</span></p> <p><span style="font-family: Arial;"> 若您確定是使用Write Through 設定值,請按下[Yes]</span></p> <p><img border="0" alt="P1060810.JPG" src="https://twcsd.acer.com.tw/acerdl/upload/tbFaq/F201107042/P1060810.JPG" width="492" height="141" class="embedImage-img importedEmbed-img"></img></p> <p><span style="font-family: Arial;">
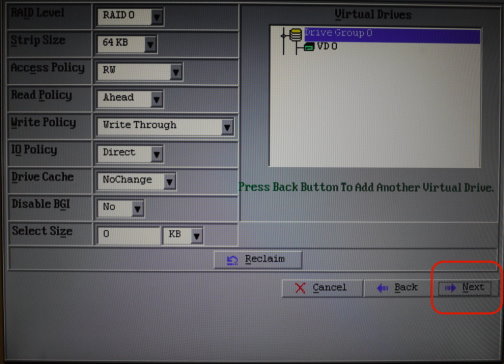
14.選取Yes後,可看到以下畫面,Virtual Drives中會出現VD0(PS.若有多個RAID,則會出現VD1.2....)</span></p> <p><span style="font-family: Arial;"> 確定無誤後,請按[Next]</span></p> <p><img border="0" alt="P1060811.JPG" src="https://twcsd.acer.com.tw/acerdl/upload/tbFaq/F201107042/P1060811.JPG" width="504" height="364" class="embedImage-img importedEmbed-img"></img></p> <p><span style="font-family: Arial;">
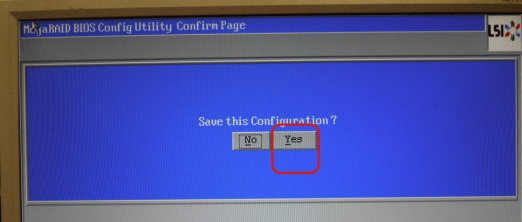
15.系統再次確定您是否存下此Configuration</span></p> <p><img border="0" alt="P1060813.JPG" src="https://twcsd.acer.com.tw/acerdl/upload/tbFaq/F201107042/P1060813.JPG" width="522" height="222" class="embedImage-img importedEmbed-img"></img></p> <p><span style="font-family: Arial;">
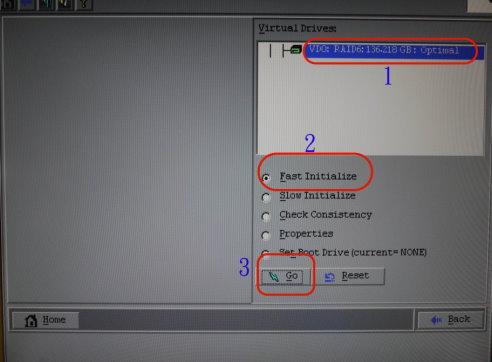
16.RAID設定完成,但別忘了要做Initialize,步驟如下畫面</span></p> <p><img border="0" alt="P1060815.JPG" src="https://twcsd.acer.com.tw/acerdl/upload/tbFaq/F201107042/P1060815.JPG" width="492" height="362" class="embedImage-img importedEmbed-img"></img></p> <p><span style="font-family: Arial;">
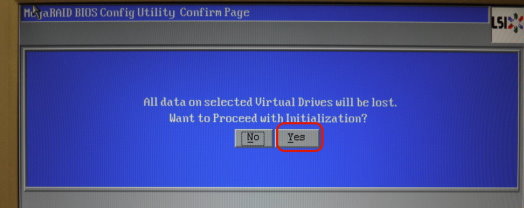
17.因為進行Initialize動作會清除所有硬碟中資料,所以系統會再次提醒確定動作</span></p> <p><img border="0" alt="P1060816.JPG" src="https://twcsd.acer.com.tw/acerdl/upload/tbFaq/F201107042/P1060816.JPG" width="524" height="208" class="embedImage-img importedEmbed-img"></img></p> <p><span style="font-family: Arial;">
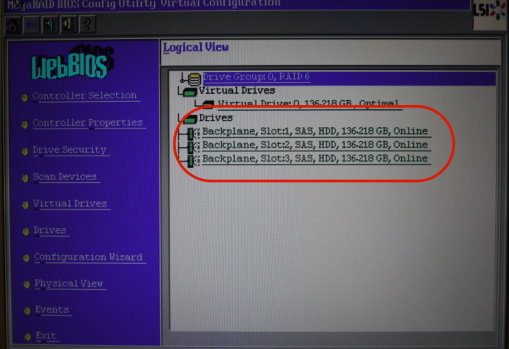
18.RAID規劃好,Initialize也做完後,將會出現如下畫面,所有RAID中的硬碟會顯示online狀態</span></p> <p><span style="font-family: Arial;"> 利用Tab選到EXIT即可離開設定畫面</span></p> <p><img border="0" alt="P1060817.JPG" src="https://twcsd.acer.com.tw/acerdl/upload/tbFaq/F201107042/P1060817.JPG" width="509" height="349" class="embedImage-img importedEmbed-img"></img></p> <p><span style="font-family: Arial;">
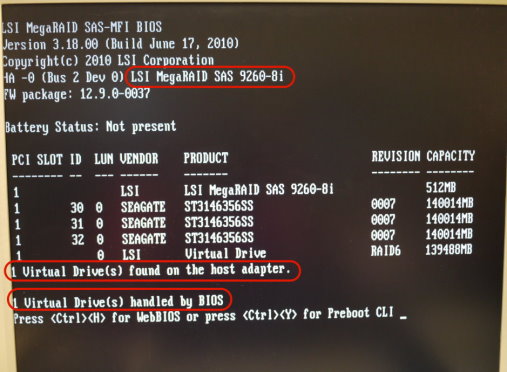
19.設定完成後,在開機過程POST畫面中可看到以下資訊,表示RAID設定完成!!</span></p> <p><img border="0" alt="P1060818.JPG" src="https://twcsd.acer.com.tw/acerdl/upload/tbFaq/F201107042/P1060818.JPG" width="507" height="372" class="embedImage-img importedEmbed-img"></img></p> <p> </p> <p><span style="font-family: Arial;"></span> </p> <p><span style="font-family: Arial;"></span> </p> <p> </p> <p> </p> <p> </p> <p> </p> <p><span style="font-family: Arial;"></span> </p> <p><span style="font-family: Arial;"></span> </p> <p> </p><meta content=""></meta> </article> </main>
Videos that might interest you