Enabling Onboard SATA RSTe RAID
1. Please press F2 to enter BIOS Setup during POST.
2. Please press F9 to load default BIOS settings.
3. In Main Page, change Quiet Boot from Enabled to Disabled.
Quiet Boot [Disabled]
4. In Advanced Page, select Mass Storage Controller Configuration
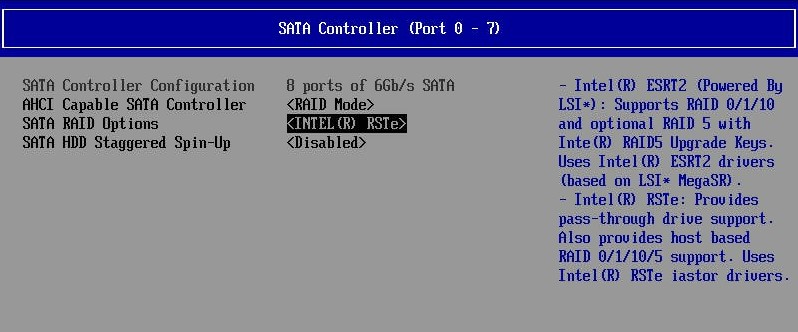
5. Please select the SATA port that is connecting to the HDDs.
sSATA Controller (Port 0 – 5)
SATA Controller (Port 0 – 7)
6. You would see below information:
AHCI Capable SATA Controller [AHCI]
7. Please change the setting of AHCI Capable SATA Controller from AHCI to RAID Mode.
AHCI Capable SATA Controller [RAID Mode]
8. Make sure the setting of SATA RAID Options is INTEL (R) RSTe
SATA RAID Options [INTEL (R) RSTe]
9. Save the setting and exit from BIOS Setup
Set Onboard SATA RSTe RAID in EFI Mode or Legacy Mode
1. Please press F2 to enter BIOS Setup during POST.
2. In Boot Maintenance Manger Page, select Advanced Boot Options
3. You would see below information.
Boot Mode [UEFI]
4. To enable legacy mode, please change the setting to Legacy.
Boot Mode [Legacy]
5. To enable EFI mode, please change the setting to UEFI.
Boot Mode [UEFI]
6. Press F10 to save the setting and exit from BIOS Setup.
EFI Mode
Entering Onboard SATA RSTe RAID BIOS Utility (EFI Mode)
Please press F2 to enter BIOS Setup during POST. In BIOS Setup, select Advanced > PCI Configuration > UEFI Option ROM Control > Intel RSTe SATA Controller to configure Onboard SATA RSTe RAID in EFI mode.

Loading Factory Default Setting (EFI Mode)
NOTE. The Onboard SATA RSTe RAID BIOS utility does not provide the function to load factory default setting.
Creating a RAID Volume (EFI Mode)
1. Select Create RAID Volume.

2. The Create RAID Volume displayed.
3. Type in the name of RAID volume.
4. Select RAID level.
5. Select desired HDD to create the RAID.
6. Select Strip Size.
7. Select Capacity.
8. Select Create Volume.
9. Now the RAID volume is created, you can press ESC and press F10 to save and exit.
Initializing a RAID Volume (EFI Mode)
The RAID volume will be automatically initialized once it has been created.
Assigning a Hot Spare Drive (EFI Mode)
1. Select Create Volume.
2. Select the disks from Non-RAID Physical Disks.
3. Select Mark as Spare.
4. Select Y to confirm
Legacy Mode
Entering Onboard SATA RSTe RAID BIOS Utility (Legacy Mode)
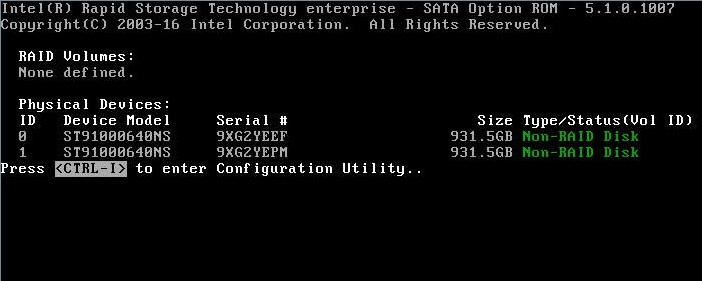
Please press CTRL-I when you see the RAID BIOS during POST.
Loading Factory Default Setting (Legacy Mode)
NOTE. The Onboard SATA RSTe RAID BIOS utility does not provide the function to load factory default setting.
Creating a RAID Volume (Legacy Mode)
1. Select Create RAID Volume.

2. The CREATE VOLUME MENU displayed.
3. Type in the name of RAID volume.
4. Select RAID level.
5. Select desired HDD to create the RAID.
6. Select Strip Size.
7. Select Capacity.
8. Select Create Volume.
9. Press Y when “Are you sure you want to create the volume? (Y/N):” displayed.
10. Now the RAID volume is created, you can press ESC and select Exit to exit.
Initializing a RAID Volume (Legacy Mode)
The RAID volume will be automatically initialized once it has been created.
Assigning a Hot Spare Drive (Legacy Mode)
1. Select Mark Disk as Spare.
2. Select the disks that will be marked as spare disk by Space key.
3. Press Y to confirm.