Aspire E5-576G-5762 No sound and sometimes no display when connecting to tv through HDMI

Tinkerer
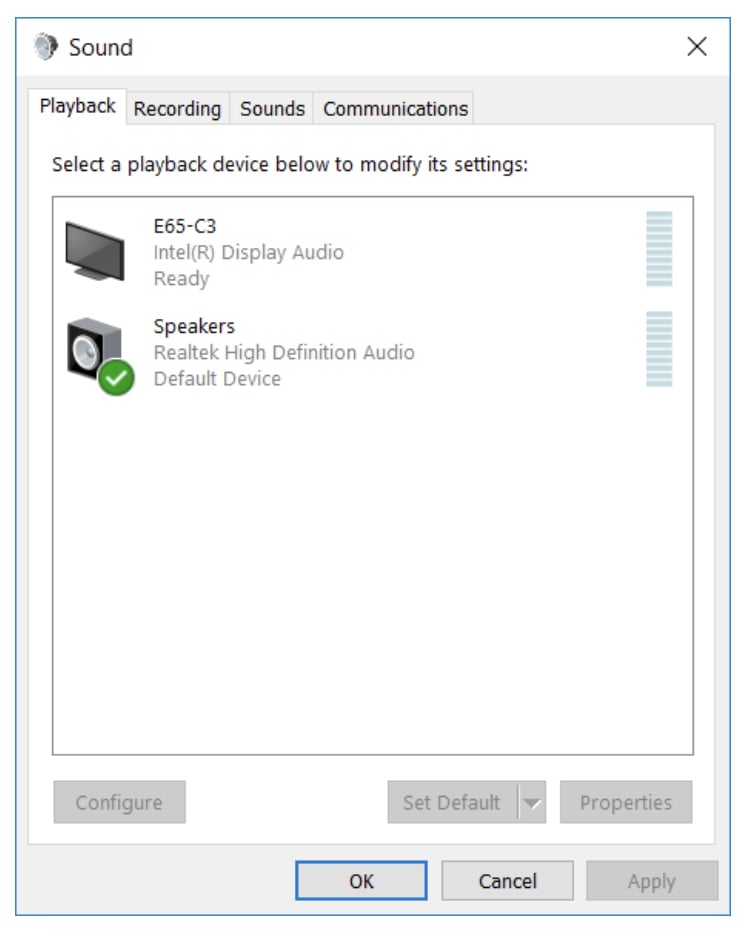
I’ve attached a pic of the Sound manager when the HDMI was plugged in this morning. Now when I plug it in, the tv isn’t recognized. So sometimes the display doesn’t work, but the sound just doesn’t work at all.
Melhor resposta
-
tmonique80
Hi,
Since it is working fine with your friends laptop that means the issue might be with the computer, port or cable. Please follow the details given below to isolate the issue. Please remember the issue you are facing is related with sound, display and hdmi cable. Let us work on the issue. Try to use the hdmi cable on different ports and check.When connecting your computer to an HDMI device, such as a monitor, TV, or surround sound speakers, you might encounter display or sound issues.
Step 1: Use the correct HDMI cable for your HDMI device
Most HDTV devices have more than one HDMI input port, therefore it is very important that the HDMI display's input source is set to the same HDMI port that is connected to your computer, for example HDMI 2 to HDMI 2.
Step 2: Select HDMI sound output as the default audio device
Select the HDMI device as the default output device. When an external sound device is not connected to the computer, the sound settings revert to your computer's speakers and headphones. When the HDMI device is connected to the computer, the sound settings change to the HDMI device. Open sound settings to ensure the correct output device is selected.
1. Connect the HDMI cable to your computer and to your output device.
2. In Windows, search for and open Control Panel.
3. Click Sound, and then click the Playback tab.
4. The Sound window opens. On the Playback tab, select Speaker/Headphone or Speakers and Headphones, and then click Set Default.
NOTE:
Use Default Devices for audio output devices such as headphones or speakers. Use Default Communication Device for making and receiving phone calls.
5. Select the output device connected with the HDMI cable, and then click Set Default.
6. Right-click the output device connected with the HDMI cable, and then select Show Disconnected Devices. The HDMI cable must be connected when it is configured.
7. To view all the available sound devices, right-click any device shown in the Sound window and select the Show Disabled Device and Show Disconnected Devices options.
Step 3
Step 4: Use the Windows Sound troubleshooter
Use the troubleshooter to resolve audio playback issues.
1. In Windows, search for and open Control Panel.
2. Click Troubleshooting.
NOTE:
If you do not see Troubleshooting listed, change the View by: (Located in the upper right corner of the screen) to Large Icons.
3. Under Hardware and Sound, click Troubleshoot audio playback.
NOTE:
Administrator permission is required to run this program. If prompted, type the administrator password or provide confirmation.
4. The Sound troubleshooter opens. Click Next. The troubleshooter begins checking the audio service status.
5. Select the device you want to troubleshoot, and then click Next.
6. Follow the on-screen instructions and make any changes suggested by the troubleshooter. When done, close the troubleshooter.
Step 4
Remove the hdmi cable from your computer.
Try windows +x click on device manager or Try windows +r - On the run window - type devmgmt.msc
On the device manager
Expand Display and sound and usb
Right click on Display driver - click on update
Right click on Sound driver - click on update
Expand usb
Right click on each item below and click on uninstall.
Restart the computer.
Connect the hdmi cable.
check how it is working now..
Step 5
Remove And Re-install Sound Driver-
Go to The Device Manager >Sound, video, and Game Controllers
Select Your Sound Driver And Right Click On It.
Now Click On Uninstall And Delete Sound Driver.
Restart Your Computer
Step 6
Remove And Re-install Sound Driver-
Go to The Device Manager >Display adapter
Select Your Display Driver And Right Click On It.
Now Click On Uninstall And Delete Sound Driver.
Restart Your Computer
Check how it is working now..
If the comments are helpful, please click on "like"
If the comments resolves your issue, please click on "Yes"
Click on "Like" if you find my answer useful
Click on "Yes" if it answers your question.
Please click YES if I answered your question
I am not an ACER employee Thank you and have a BLESSED AND HAPPY DAY
 ★★ WILLIAM - MRK ★★
0


Respostas
-
tmonique80
Hi,
Since it is working fine with your friends laptop that means the issue might be with the computer, port or cable. Please follow the details given below to isolate the issue. Please remember the issue you are facing is related with sound, display and hdmi cable. Let us work on the issue. Try to use the hdmi cable on different ports and check.When connecting your computer to an HDMI device, such as a monitor, TV, or surround sound speakers, you might encounter display or sound issues.
Step 1: Use the correct HDMI cable for your HDMI device
Most HDTV devices have more than one HDMI input port, therefore it is very important that the HDMI display's input source is set to the same HDMI port that is connected to your computer, for example HDMI 2 to HDMI 2.
Step 2: Select HDMI sound output as the default audio device
Select the HDMI device as the default output device. When an external sound device is not connected to the computer, the sound settings revert to your computer's speakers and headphones. When the HDMI device is connected to the computer, the sound settings change to the HDMI device. Open sound settings to ensure the correct output device is selected.
1. Connect the HDMI cable to your computer and to your output device.
2. In Windows, search for and open Control Panel.
3. Click Sound, and then click the Playback tab.
4. The Sound window opens. On the Playback tab, select Speaker/Headphone or Speakers and Headphones, and then click Set Default.
NOTE:
Use Default Devices for audio output devices such as headphones or speakers. Use Default Communication Device for making and receiving phone calls.
5. Select the output device connected with the HDMI cable, and then click Set Default.
6. Right-click the output device connected with the HDMI cable, and then select Show Disconnected Devices. The HDMI cable must be connected when it is configured.
7. To view all the available sound devices, right-click any device shown in the Sound window and select the Show Disabled Device and Show Disconnected Devices options.
Step 3
Step 4: Use the Windows Sound troubleshooter
Use the troubleshooter to resolve audio playback issues.
1. In Windows, search for and open Control Panel.
2. Click Troubleshooting.
NOTE:
If you do not see Troubleshooting listed, change the View by: (Located in the upper right corner of the screen) to Large Icons.
3. Under Hardware and Sound, click Troubleshoot audio playback.
NOTE:
Administrator permission is required to run this program. If prompted, type the administrator password or provide confirmation.
4. The Sound troubleshooter opens. Click Next. The troubleshooter begins checking the audio service status.
5. Select the device you want to troubleshoot, and then click Next.
6. Follow the on-screen instructions and make any changes suggested by the troubleshooter. When done, close the troubleshooter.
Step 4
Remove the hdmi cable from your computer.
Try windows +x click on device manager or Try windows +r - On the run window - type devmgmt.msc
On the device manager
Expand Display and sound and usb
Right click on Display driver - click on update
Right click on Sound driver - click on update
Expand usb
Right click on each item below and click on uninstall.
Restart the computer.
Connect the hdmi cable.
check how it is working now..
Step 5
Remove And Re-install Sound Driver-
Go to The Device Manager >Sound, video, and Game Controllers
Select Your Sound Driver And Right Click On It.
Now Click On Uninstall And Delete Sound Driver.
Restart Your Computer
Step 6
Remove And Re-install Sound Driver-
Go to The Device Manager >Display adapter
Select Your Display Driver And Right Click On It.
Now Click On Uninstall And Delete Sound Driver.
Restart Your Computer
Check how it is working now..
If the comments are helpful, please click on "like"
If the comments resolves your issue, please click on "Yes"
Click on "Like" if you find my answer useful
Click on "Yes" if it answers your question.
Please click YES if I answered your question
I am not an ACER employee Thank you and have a BLESSED AND HAPPY DAY ★★ WILLIAM - MRK ★★
0 -
Took forever to get back to this. But after I completed step 2, it worked. Thanks!0